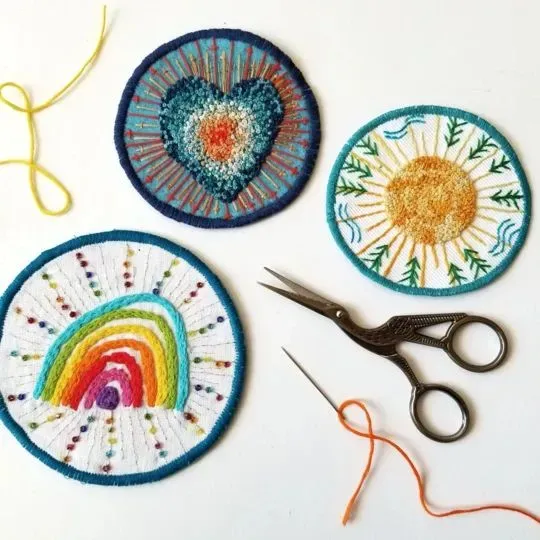
DIY Embroidered Patches reveal how you can transform everyday garments into unique, stitched stories with simple, satisfying techniques. From denim jackets to backpacks, these patches let you express style, tell a story, and upgrade basic pieces with color and texture. Learn patch embroidery techniques that range from clean satin stitches to playful accents, and discover how iron-on patches simplify quick customization. Whether you prefer hand-embroidered patches or machine work, you can design custom patches that reflect your personality. With a few basic tools for sewing patches, you’ll build durable patches that stay vibrant through repeated wear.
Beyond single-thread projects, you can think of these wearable emblems as handcrafted fabric badges designed at home. They’re essentially fabric patches with embroidery, customizable appliques that attach to jackets, bags, or hats. Following LSI principles, terms like fabric badges, embroidered patches, and decorative appliques broaden how you think about this craft. Backing options, transfer methods, and stitch counts shape the final look, offering a flexible palette of color, texture, and scale. This approach fits the broader trend toward sustainable, self-made fashion and empowers you to tailor pieces to your wardrobe.
DIY Embroidered Patches: Design Principles and Planning
Begin with a clear idea of the motif, whether it’s a simple emblem, initials, or a tiny illustration. Consider how the shape, size, and placement will read on your chosen garment, and map out a basic layout before you pick stitches. This planning stage anchors your patch embroidery techniques, guiding color harmony and edge definition so the final badge feels intentional rather than improvised.
A well-planned patch is more than just a decorative accent; it’s a statement of identity and style. By starting with a circular, shield, or badge shape, you simplify the stitching process and set a strong silhouette that stands up to wear. Whether you’re aiming for bold, graphic patch embroidery techniques or a more delicate hand-embroidered look, your design should reflect how you want it to speak on your wardrobe and coordinate with existing colors.
Materials and Tools for Patch Embroidery Techniques
Selecting sturdy fabrics and a compatible stabilizer is the foundation of durable patches. Denim, twill, canvas, and felt hold their shape under dense stitches, while a lightweight tear-away or cut-away stabilizer protects the back during embroidery. These material choices directly influence the outcome of your patch embroidery techniques and the longevity of the finished badge.
Assemble a practical toolkit: hoop or frame for taut fabric, a curated thread palette, appropriate needles, scissors, and a choice of backing. Decide early whether you want iron-on patches for quick application or sew-on backing for long-lasting wear. Transfer tools and a clean workspace round out the setup, making each stitching session smoother and more enjoyable.
Transferring Your Design: From Sketch to Stitch
Once your design is sketched, transferring it accurately to fabric is the next critical step. Methods include tracing on a lightbox with a water-soluble pen, using a temporary stabilizer to prevent distortion, or freehand drawing for a freer, more expressive outcome. Each approach supports different patch embroidery techniques and helps you maintain clean lines as you begin stitching.
After the design is transferred, secure the fabric in your embroidery hoop and prepare for stitching. Leave a small seam allowance if you plan to cut around the patch later, ensuring neat edges. This bridging stage between planning and stitching is where precision design meets practical execution, setting the stage for consistent, high-quality results.
Stitching Techniques for Texture and Depth
The core of your patch is the stitching. Core stitches like satin stitch, backstitch, running stitch, and texture-enhancing options such as split stitch and stem stitch create depth and dimension. Whether you’re crafting hand-embroidered patches or preparing for machine stitches, mastering these patch embroidery techniques gives you control over color, shading, and contour.
As you gain confidence, you can layer colors and alternate stitches to simulate light and shadow. Start with a two-color approach to learn stitch rhythm before expanding to gradients or mixed stitches. This gradual progression helps you refine technique and achieve a more professional, durable patch that holds up to wear.
Backing Options: Iron-On Patches, Sew-On, and Hybrids
Backing choice influences how you apply and how well your patch wears. Iron-on backing provides a quick, heat-activated bond that’s ideal for fast customization, but it requires careful testing on your fabric to avoid scorching or adhesive bleed. For patches subjected to frequent washing, sew-on backing offers greater durability and security.
Hybrid backing blends the accessibility of iron-on with the durability of sew-on, often using a fusible stabilizer or partial adhesive to balance hold and longevity. Regardless of the backing you choose, finishing the edges with a tight satin stitch improves wear resistance and lends a polished, professional appearance to your patch.
Finishing, Care, and Creative Uses for Custom Patches
After stitching, trim the patch with a small seam allowance and seal edges with a final, neat stitch. Proper finishing reduces bulk and helps the patch sit flush on fabric. Caring for patches—hand-washing or cold-machine cycles and avoiding high heat—preserves color and adhesive integrity for iron-on patches.
Custom patches unlock creative ways to upgrade a wardrobe. Use them on denim jackets, backpacks, hats, sneakers, or laptop sleeves to tell a story or express a fandom. With thoughtful design and reliable patch embroidery techniques, your patches become wearable art—versatile, collectible, and uniquely yours.
Frequently Asked Questions
What are DIY Embroidered Patches and how can I start using them to customize my wardrobe?
DIY Embroidered Patches are handmade badges you stitch onto fabric to create custom patches that personalize clothing and accessories. They start with a simple idea, a chosen patch embroidery technique, and a design you transfer onto sturdy fabric, then finish with either iron-on backing for quick wear or sew-on backing for durability.
What materials and tools do I need for DIY Embroidered Patches?
For DIY Embroidered Patches, gather sturdy fabrics (denim, twill, canvas, or felt), a stabilizer, an embroidery hoop, cotton floss or machine threads, embroidery needles, scissors or a rotary cutter, and your choice of backing (iron-on or sew-on). Don’t forget transfer tools and a small iron or pressing mat to finish the edges.
How do I transfer a design for DIY Embroidered Patches, and which methods work best?
Transferring the design is the bridge to stitching your DIY Embroidered Patches. Use tracing on a lightbox with a water-soluble pen, a temporary stabilizer, or freehand chalk. After transferring, secure the fabric in an embroidery hoop and begin stitching.
What backing options are available for DIY Embroidered Patches, and when should I choose iron-on vs sew-on?
Backing choices affect application and durability. Iron-on patches are quick and convenient for easy application, while sew-on patches offer long-lasting wear. A hybrid approach or testing on your fabric can balance hold and washability for your DIY Embroidered Patches.
Which stitch techniques are essential for patch embroidery in DIY Embroidered Patches?
Core patch embroidery techniques include satin stitch for solid color fills, backstitch for clean outlines, running stitch for light texture, plus split or stem stitches for shading and French knots for small dots. Start with two colors to learn the rhythm before adding more.
How should I finish and care for my DIY Embroidered Patches to keep them looking new?
Finish by trimming with a small seam allowance and sealing edges with a tight stitch. For backing, follow care guidelines: hand wash or cold delicate machine wash, and avoid high heat drying. Sew-on backing tends to be the most durable for wash‑wear patches.
| Section | Key Points |
|---|---|
| Introduction |
“} as string]},{ |
Summary
DIY Embroidered Patches offer a creative, sustainable way to upgrade your wardrobe and tell your story through handcrafted badges. This descriptive overview highlights how a simple idea can grow into a full patch project—from selecting sturdy fabrics and stabilizers to choosing stitches and backing options. By planning, transferring, stitching, and caring for patches, crafters of all levels can turn plain garments into durable, one-of-a-kind accents. Embrace experimentation with color, texture, and techniques to build a personal collection of DIY Embroidered Patches that express your style.