Embroidered design techniques open up a world of texture, color, and personality on fabric, inviting you to transform plain cloth into wearable art and home accents that reflect your personal taste and story. When you combine careful planning with patient stitching, you can elevate even a modest piece of material into a captivating textile statement that suits a wardrobe, a sofa, or a treasured heirloom. This guide concentrates on satin stitch embroidery techniques and French knots embroidery as a foundation for depth, while pairing an embroidery stitches guide with practical tips, troubleshooting notes, and project-ready examples. By choosing appropriate fabrics—linen, cotton, or even lightweight denim—you learn how stitch density, tension, color reading, and fabric weave interact to influence the final look. Whether you are starting with beginner embroidery projects or expanding toward more complex motifs, this descriptive overview helps you plan, practice, and enjoy the texture embroidery stitches you create, that you can comfortably make time for.
In broader terms, textile embellishment through stitch-based techniques encompasses a family of methods that decorate fabric with thread. This alternative framing leverages related terms such as threadwork, surface ornamentation, and hand-stitching approaches to describe the same art. Readers exploring satin stitch, French knots, and related stitches will recognize how these elements contribute to depth, texture, and color. By thinking in terms of fiber art, rather than only named stitches, you can plan projects that combine practical projects with creative experimentation. The language of needlecraft, fabric design, and textile craft helps connect beginners to a broader community of makers who share tips, patterns, and inspiration.
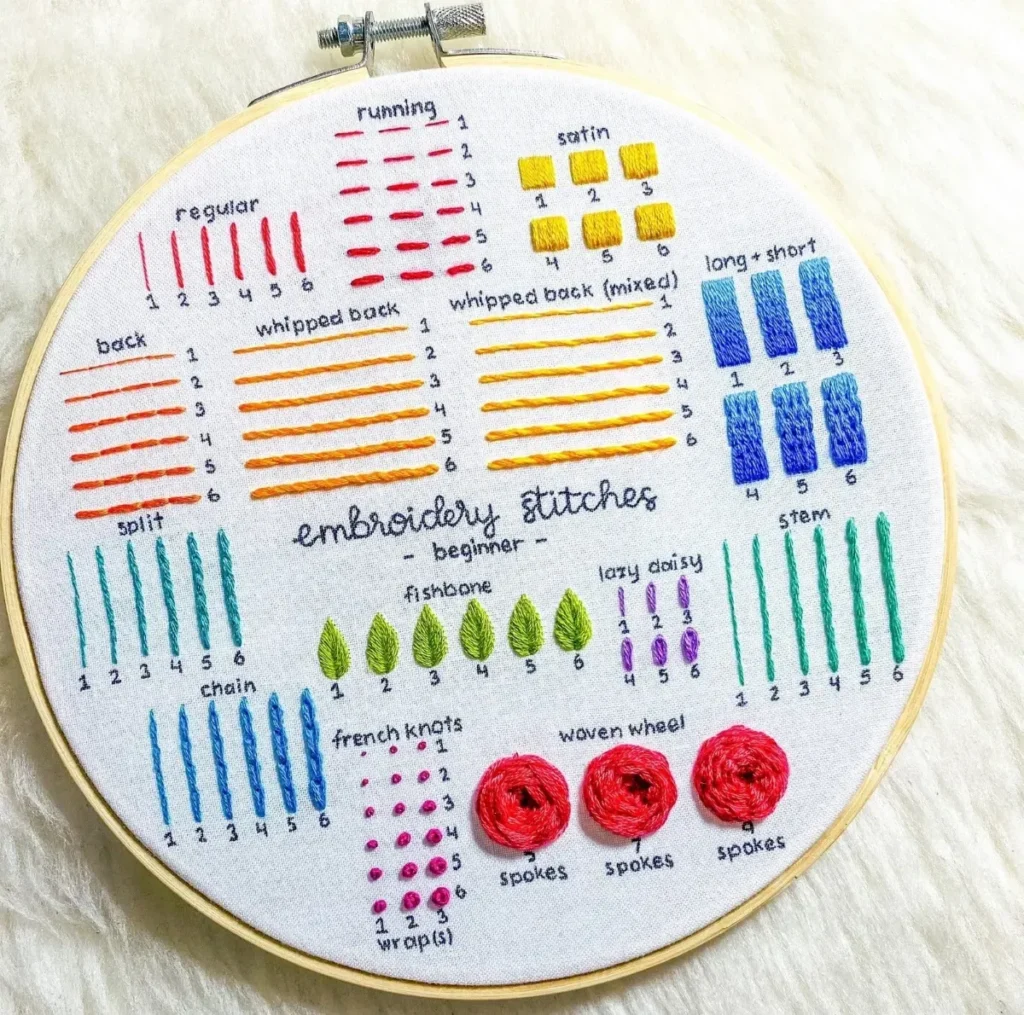
Satin Stitch Mastery for Smooth Coverage
Satin Stitch serves as the foundation for smooth, solid color in embroidered design techniques. By controlling thread tension and stitching in neat, parallel rows, you can fill shapes, letters, and bold surfaces with a glossy finish. This approach aligns with the idea of satin stitch embroidery techniques that emphasize even coverage and a clean edge, making every project look polished and professional.
To maximize results, consider this as a step-by-step embroidery stitches guide: prepare taut fabric in a stable hoop, outline your shape, and then build up stitches in the same direction. Testing on a swatch helps you refine stitch length and spacing before committing to your main piece. Beginners can start with small, simple areas and gradually expand to larger fills, which reinforces the habit of consistent tension and careful planning.
French Knots for Three-Dimensional Texture
French Knots introduce dimensional texture that can resemble seeds, beads, or tiny petals. They are a hallmark of embroidery that adds tactile interest and visual whimsy, especially when used to highlight centers of flowers or decorative accents. Mastering French Knots embroidery involves a gentle touch and controlled wrapping of the thread around the needle, resulting in neat, rounded knots that sit pleasantly on the fabric.
If knots are too loose or too tight, adjust your wrap count and fabric tension. Practice on scrap fabric to dial in the number of wraps and the pressure you apply as you pull the knot into place. This small technique, when repeated across a design, can transform flat stitching into lively texture embroidery stitches that catch the eye from multiple angles.
Embroidered design techniques: A Cohesive Skill Set
Embroidered design techniques are best approached as a cohesive language rather than a hodgepodge of isolated stitches. By combining Satin Stitch, French Knots, and supporting stitches like Stem Stitch or Backstitch, you can craft pieces with depth, movement, and color harmony. This philosophy treats the craft as a growing toolkit where each stitch informs the next, rather than as a catalog of separate tasks.
A well-rounded project balances color relationships, texture, and scale. Consider how bold Satin Stitch areas interact with lighter, textural accents from French Knots, and how fabric choice influences stitch behavior. With a clear plan and a few practiced techniques, you can design motifs that feel both deliberate and expressive, applying the embroidery stitches guide to guide your decisions from outline to finishing.
The Embroidery Stitches Guide: Essential Tools and Techniques
An effective embroidery journey starts with the right tools and environment. The embroidery stitches guide typically recommends quality fabrics (linen, cotton, Aida, or lightweight denim), a stable hoop, sharp needles, a variety of threads (cotton floss, perle, or silk), and a reliable marking method. With these essentials in place, you can focus on technique, from Satin Stitch’s smooth fills to French Knots’ dimensional dots, while keeping your setup comfortable for longer practice sessions.
Beyond the basics, the guide encourages exploring additional stitches to diversify texture and outline work. Stem Stitch and Backstitch are ideal for delicate curves, while Chain Stitch and Couching offer decorative textures for borders and motifs. A thoughtful embroidery stitches guide suggests planning a piece as a sequence of decisions—outlining, filling, detailing, and texturing—so that your final work remains balanced and cohesive.
Beginner Embroidery Projects: Start with Samplers and Simple Motifs
Beginner embroidery projects are designed to build confidence while teaching core skills. Start with a practice sampler that combines Satin Stitch, French Knots, and a few additional stitches in a simple grid or floral motif. A 6-by-6 inch canvas with a bordered square filled with Satin Stitch, plus a line of French Knots for centers or seeds, provides a practical path from novice to more confident stitcher.
As you progress, use the sampler to map how different stitches behave on your chosen fabric and to test tension, stitch length, and edge control. The process of creating a small, repeatable project builds a solid habit of planning and execution, setting the stage for beginner embroidery projects that expand into clothing, home decor, or framed art.
Texture Embroidery Stitches: Adding Depth and Movement
Texture embroidery stitches bring depth and movement to a piece by combining different stitch types and densities. Use a mix of smooth Satin Stitch blocks alongside textured knots and decorative stitches to create contrast and visual interest. This approach helps prevent designs from feeling flat and invites the eye to travel across the fabric surface.
When layering textures, consider scale, proportion, and color density to maintain balance. A well-planned composition uses texture as a storytelling element—dense satin fills paired with light, airy knots can evoke both structure and whimsy. By exploring texture embroidery stitches in your projects, you can craft pieces that are not only beautiful but also tactile and engaging to touch.
Frequently Asked Questions
What are satin stitch embroidery techniques and how do they help create smooth color blocks in embroidered design techniques?
Satin stitch embroidery techniques create smooth, solid color blocks by filling shapes with closely spaced stitches that lie flat in the same direction. Start with a taut fabric in an embroidery hoop, outline your shape, then fill in rows with consistent stitch length and even tension. Finish edges neatly and test on a swatch. Satin stitch variations—short, long, curved fills—offer subtle texture while maintaining a glossy surface. This technique works well on linen, cotton, or lightweight denim and forms the foundation of many embroidered design techniques.
How can French knots embroidery add dimensional detail to fabric in embroidered design techniques?
French knots embroidery adds dimensional detail by forming small raised dots that mimic beads or seeds. Thread the needle, bring up at the desired spot, wrap the thread around the needle 2–3 times, then insert back close to the entry and pull snug. Secure the tail at the back with a tiny stitch. Practice on scrap fabric to dial in wraps and tension; inconsistent wraps yield loose or bulky knots. Use for eyes, centers of flowers, or decorative accents.
How can an embroidery stitches guide help me plan a project that uses texture embroidery stitches effectively?
An embroidery stitches guide helps you plan by mapping which stitches to use for outlines, fills, and texture. It supports balancing Satin Stitch blocks with texture embroidery stitches, deciding where to place knots or stem stitches, and ensuring the project reads cohesively. Use the guide to select stitch types, order steps (outline, fill, detail), and maintain consistent density and scale across the design.
What beginner embroidery projects are best to practice satin stitch and French knots in embroidered design techniques?
For beginners, a simple sampler is ideal to practice satin stitch and French knots in embroidered design techniques. Try a 6-by-6 inch grid featuring a satin-stitch filled square, a line of French knots for centers or seeds, and a curved stem with a basic outline stitch. This approach builds confidence, lets you compare tension, and shows how different stitches interact on your chosen fabric. As you improve, add more stitches and color layers.
How can texture embroidery stitches be used to create depth without overpowering a design?
Texture embroidery stitches add depth by combining dense color areas with lighter, tactile accents. Use Satin Stitch for bold blocks and reserve French Knots or stem stitches for texture, spacing them to avoid overcrowding. Adjust scale and density to maintain balance—large areas may benefit from restrained color density, while small motifs can support richer texturing. This keeps the design readable while enhancing dimension.
What fabric and thread choices best support satin stitch embroidery techniques and French knots embroidery in embroidered design techniques?
Choosing the right fabric and threads supports both satin stitch embroidery techniques and French knots embroidery. Opt for a stable fabric like linen or cotton, or a smooth Aida for counted work, and consider lightweight denim for a casual look. Pair with cotton embroidery floss, cotton perle, or silk threads to achieve different luster and drape. Use an appropriate needle and a hoop to maintain tension, and always test stitches on a swatch before committing to the final piece.
| Topic | Key Points | Notes/Examples |
|---|---|---|
| Introduction to Embroidered Design Techniques | Adds texture, color, and personality to fabric; cohesive skill set; Satin Stitch & French Knots as core focus; adaptable to linen, cotton, denim | Aimed at turning plain material into art; build a transferable embroidery practice. |
| Satin Stitch: Foundation | Solid color fills; outlines and bold surfaces; requires careful thread control and even spacing | Steps include preparing fabric, outlining shape, creating even stitches, maintaining tension, and finishing edges. |
| Satin Stitch Variations | Short/long stitches, curved/diagonal fills; texture and tone variation; suitable for delicate fabrics | Test swatches; choose appropriate needle and thread; beginners can start with basics and expand. |
| French Knots | Adds dimension and playful detail; 2–3 wraps per knot; used for centers, eyes, and small accents | Tutorial steps: thread, bring up, wrap, insert, pull tight, secure at back. |
| Troubleshooting French Knots | Adjust wrap count and tension; avoid fraying; practice on scraps | Over-wrapping or under-wrapping causes bulky or loose knots; practice to dial in tension. |
| Expanding Your Stitch Repertoire | Beyond Satin & French Knots: Stem, Backstitch, Chain, Couching for outlines, texture, and borders | Combining stitches creates contrast; plan motif from outline to fill to texture. |
| Tools, Materials, and Environment | Essential gear and setup for success: fabric, hoop, needle, threads, markers, scissors, lighting | Stable base and proper tools improve stitch quality and ease. |
| Starting a Simple Practice Sampler | Hands-on way to combine Satin Stitch, French Knots, and other stitches | Example: 6×6 inch canvas with Satin Stitch, French Knots centers, Stem/Backstitch lines. |
| Design Principles: Color, Texture, and Composition | Balance color relationships, texture variations, proportional motifs, and fabric choice | Aim for harmony between bold areas and lighter accents; fabric weave influences stitch behavior. |
| Embroidery as a Craft: Beginner Friendly and Beyond | Starting simple and layering stitches; applications in clothing, home decor, or art | Progress from basic shapes to more complex designs as confidence grows. |
| Common Mistakes and How to Avoid Them | Tension control, fabric/needle suitability, securing threads; practice on scrap; plan motif | Secure back threads with finishing stitches; test stitches on swatches. |
| Projects and Inspiration | Apply techniques to garments, decor, and art; diverse project ideas to practice | Examples: Satin Stitch petals with French Knot centers; monograms; decorative cushions. |
| Care and Finishing | Post-stitch care to preserve integrity; washing, pressing, and finishing tips | Hand wash cool water, lay flat to dry; press from the back with cloth to protect stitches. |
| Conclusion: Practice, Patience, and Progress | Recap of techniques as a language of texture and mood; steady practice grows mastery | Build a routine, note what works on your fabric, and evolve your embroidered design techniques with each project. |
Summary
Key points summarized: Embroidered design techniques weaving texture, color, and practicality across fabrics, with Satin Stitch and French Knots at the core, supplemented by a expanding toolkit of stitches, proper tools, practice, and thoughtful design principles. The table provides concise takeaways by topic, aiding quick reference for learners and practitioners.