Designing standout embroidered patches is as much about storytelling as it is about stitch work. In a world crowded with badges, enamel pins, and digital logos, a well-crafted patch becomes a portable brand ambassador, a cherished memory, or a bold, conversation-starting statement that travels across jackets, bags, and uniforms. This guide follows an embroidered patches design checklist to move from concept to production, ensuring you build something both visually striking and technically sound, ready for proofing and approval. By layering thoughtful color, precise stitching, smart backing choices, and a garment-conscious interface, you balance visibility with durability—a core aspect of patch embroidery techniques, including stable underlay, density control, and clean edge work. From shape and material to edge finishes, backing, and quality control, every decision shapes how the patch communicates your message and stands up to wear over time.
If you prefer alternative terminology, these designs can be described as emblems, sewn badges, or stitched insignias that carry a brand story. In practice, designers translate ideas into these patches by following a structured workflow—from concept sketching and digitization to stitch planning and production readiness. The goal is a cohesive piece that reads clearly from a distance, performs well on diverse fabrics, and preserves color and texture through washing. By prioritizing durability, legibility, and practical backing options, you ensure a consistent look across lots and on different garments. Whether you call them embroidered insignias, fabric badges, or stitched patches, the underlying method remains: thoughtful ideation, precise digitization, and rigorous quality checks.
Using an embroidered patches design checklist to drive standout results
Starting with a structured embroidered patches design checklist helps ensure every decision serves the patch’s purpose. Before sketching, define the audience, the intended wear, and the environment, because these factors dictate the patch size, shape, and level of detail that will stay legible after production. When you frame goals around the audience and application, you also activate practical constraints that keep design disciplined and scalable, especially across different garments and environments. This approach aligns with the broader concept of an embroidered patches design checklist and anchors creative choices in real-world needs.
Apply the checklist across material selection, backing options, stitching density, color strategy, and edge finish to deliver patches that perform in wear and washing. The checklist encourages mindful decisions about twill or felt bases, iron-on or sew-on backings, and the balance between thread count and coverage. Integrating these choices with a clear storytelling intent helps produce high-quality embroidered patches that communicate a brand message clearly and endure over time.
Mastering patch embroidery techniques for durability and impact
Mastering patch embroidery techniques means choosing a mix of stitches that balance readability, texture, and durability. Satin stitch outlines and fills provide strong, clean color blocks; fill stitches with controlled density create smooth surfaces; chenille adds a premium tactile element; merrow edging yields a crisp border that resists fraying. Paying attention to stitch types, densities, and underlay helps avoid fabric show-through and ensures the motif reads at distance, which is crucial for patches on jackets or backpacks.
Practically, this knowledge translates into a production-friendly approach: plan color counts, simulate the patch in the digitization stage, and test density with a proto. By tying these techniques to the goal of high-quality embroidered patches, you boost durability and legibility while still enabling rich, brand-appropriate detail.
Designing standout embroidered patches: from concept to application
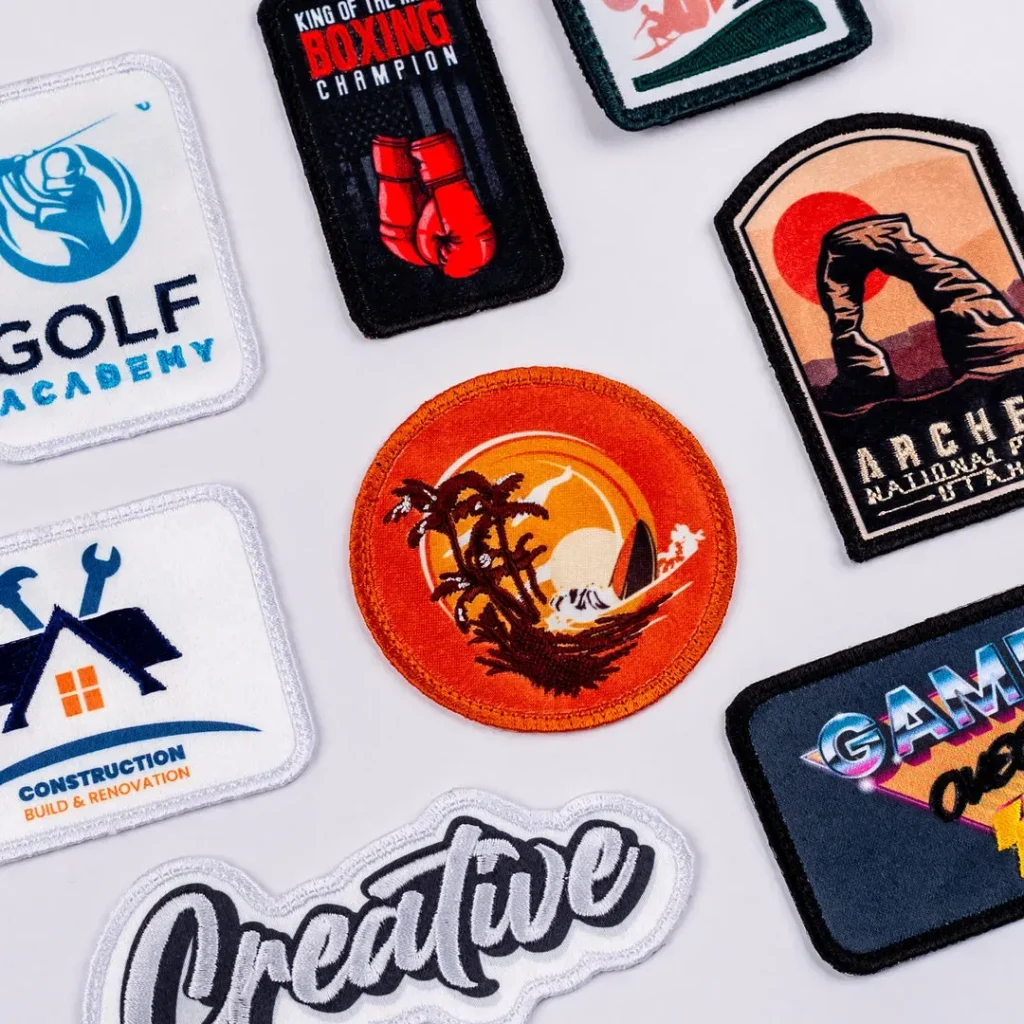
Designing standout embroidered patches is as much about storytelling as stitch selection. The phrase itself signals a balance between narrative and craft—select motifs that convey a brand story, a character, or a moment, using bold color blocks and legible silhouettes. When you adopt this mindset for product lines, you’ll naturally explore standout embroidered patches ideas such as vintage logos, crest-like emblems, or nature-inspired symbols that read clearly at patch size.
From concept to application, you must consider how the patch will sit on different garments and angles. Think about curvature on sleeves, the distance of the viewer, and how color contrast holds up under varying lighting. By aligning shape, scale, and embroidery density with your design intent, you ensure the patch remains striking—from a distance and up close—whether applied to jackets, backpacks, or uniforms. This process benefits from a cohesive custom embroidered patches design process that translates art into stitch-ready files.
The custom embroidered patches design process: digitization to production
The custom embroidered patches design process begins with clean vector artwork, careful digitization, and explicit color mapping. This stage defines how many colors will stitch, which areas receive underlay, and how edge stitches will frame the final image. By planning in a production-ready way—anticipating thread counts, material limitations, and backing compatibility—you reduce revisions and deliver files that are truly production-ready.
Early digitization decisions influence the final look and durability. A well-documented process helps ensure a consistent result across batches and installers. When you combine a thoughtful custom embroidered patches design process with robust quality checks, you create patches that meet expectations for high-quality embroidered patches and stand up to washing and wear.
Color theory and branding for standout embroidered patches ideas
Color theory and branding for standout embroidered patches ideas centers on a disciplined palette. Select hues aligned with brand colors or theme, and use Pantone-matched threads when possible to minimize batch variation. Ensure strong contrast so letters and symbols read clearly at the patch size, especially on dark fabrics or textured backgrounds.
Test color combinations on actual patch material and under typical garment lighting to account for tint, thread shine, and fabric texture. Integrating color strategy into the design process supports standout embroidered patches ideas, guiding choices that balance aesthetics with legibility and brand recognition.
Materials, backing, and finishes that boost longevity and quality
Materials, backing, and finishes that boost longevity and quality focus on foundations: patch bases like twill, felt, or felt-backed fabrics bring weight and drape; backing options such as iron-on, sew-on, or Velcro influence usability and care. Edge finishes—merrow edge, laser-cut, or heat-cut—shape durability and look, with each option offering a distinct tactile and visual finish.
Choose materials with an eye to washability and colorfastness, and pair them with backing and edges designed for the garment type. Prototyping and QC checks—density, alignment, color accuracy, and edge integrity—are essential steps to ensure the final product behaves like high-quality embroidered patches under real-world use.
Frequently Asked Questions
Designing standout embroidered patches: How does an embroidered patches design checklist guide the process from concept to production?
An embroidered patches design checklist helps define purpose, audience, size, shape, and edge finish early, then guides material, backing choice, and color strategy. It anchors the design in practical constraints and production realities, ensuring readability and durability across wear and washing. By detailing digitization, stitch planning, and testing steps, it reduces revisions and keeps the project on track from ideation to a final patch that truly stands out.
Designing standout embroidered patches: Which patch embroidery techniques are essential to achieve clarity and durability?
Key techniques include satin stitch for bold outlines, fill stitch for larger areas with careful density, and merrow or chenille edging for a clean, durable edge. Underlay stitches stabilize fabric and prevent show-through. Balancing stitch types and thread counts with the patch size ensures legible details and a robust finish, contributing to high-quality embroidered patches.
Designing standout embroidered patches: What is the custom embroidered patches design process and how does it affect consistency?
The process typically follows ideation, digitization, stitching, backing, and finishing. Start with clean artwork and color mapping, then assign stitch types and densities for each area, add underlay, and simulate the final edge. Producing a production-ready stitch file and running stitch tests reduces revisions and yields consistent results across batches.
Designing standout embroidered patches: What standout embroidered patches ideas typically translate into high-quality patches?
Effective ideas include vintage-inspired logos, bold nature motifs, retro icons, and high-contrast minimalist designs. The best ideas balance novelty with readability: avoid excessive detail that blurs at patch size. Pair a strong focal motif with supporting accents and test on the chosen fabric to ensure legibility and durability.
Designing standout embroidered patches: How should color theory and material choices support the goal of high-quality embroidered patches?
Use a limited, purposeful palette aligned with brand colors and ensure strong contrast for legibility from a distance. Prefer Pantone-matched threads to minimize batch shifts, and test color on the actual patch material to account for fabric tint and sheen. Choose durable bases (twill, felt) and backing suited to the garment to preserve color and finish over time.
Designing standout embroidered patches: Why is prototyping and quality control critical in the production-ready stage?
Prototyping validates alignment, density, and color accuracy under real wear. A quality-control protocol should include washing, abrasion, sunlight exposure, and edge integrity checks. Address issues in a prototype batch before full production to ensure the final patches meet the high standards of high-quality embroidered patches.
| Aspect | Key Points |
|---|---|
| Introduction / What makes a patch memorable? | Patches function as portable brand ambassadors, mementos, or statements. They rely on clear messaging, thoughtful color and robust construction to remain legible and appealing across wear and viewing angles. |
| Core design framework | Ideation, digitization, stitching, backing, and finishing form a simple yet powerful workflow guiding from concept to production. |
| 1) Define purpose & audience | Ask what the patch is for and who will wear it. Purpose and audience determine scale, color palette, and the level of detail that remains legible. |
| 2) Size & shape | Larger patches allow more storytelling but may be impractical on some garments. Smaller patches need crisp lines and simplified motifs for legibility. |
| 3) Materials & backing | Base fabrics such as twill or felt; backing options (iron-on, sew-on, Velcro) affect usability and care. Weight, thread count, and garment care influence durability. |
| 4) Embroidery techniques | Choose stitches (satin for outlines/fills, fill for larger areas, chenille for texture) and consider borders/underlay to stabilize and finish edges. |
| 5) Color theory | Use a limited, purposeful palette; prefer Pantone-matched threads; ensure strong contrast for legibility at distance. |
| 6) Digitization process | Start with clean artwork; map colors and stitches; plan underlay and edge stitches; run stitch tests to ensure density and edge crispness. |
| 7) Edge finish & backing details | Merrow, laser, or heat-cut edges; edge choice affects durability and look. Ensure backing compatibility with garment fabric. |
| 8) Quality control & prototyping | Prototype batches to verify alignment, density, color accuracy, and wear performance; include washing and abrasion tests. |
| 9) Production considerations | Consider MOQ, turnarounds, die-cut vs laser-cut, pricing, and sustainability factors to plan feasible production. |
| 10) Trends & ideas | Original storytelling guides standout ideas (vintage logos, bold color blocks, nature motifs) while maintaining clarity and avoiding excessive detail at patch size. |
| 11) Designer’s checklist | Define purpose, choose materials/backing, decide shape/edge, plan embroidery/color, digitize cleanly, prepare production-ready files, prototype, test readability/durability. |
| Conclusion | This content reinforces that designing standout embroidered patches blends artistry with engineering. Clear purpose, appropriate materials, thoughtful embroidery techniques, precise digitization, durable edge finishes, and rigorous prototyping all contribute to patches that communicate a brand story and endure wear. By following a disciplined design checklist and prioritizing quality control, designers can create patches that look striking, stay legible, and perform well across different garments and conditions. |
Summary
Introduction
Designing standout embroidered patches is as much about storytelling as it is about stitch work. In a world saturated with badges, enamel pins, and digital logos, a well-crafted embroidered patch can act as a portable brand ambassador, a memento, or a statement piece. This guide follows a designer’s checklist to help you move from concept to a finished patch that earns attention, communicates your message clearly, and endures through wear and washing. By focusing on practical decisions—shape, material, embroidery techniques, color, backing, and production constraints—you’ll learn how to create patches that truly stand out.
What makes a patch memorable? It starts with clarity of purpose. A standout embroidered patch communicates a brand story or character at a glance. It uses thoughtful color combinations, precise stitching, and robust construction. It also considers how the patch will be applied—on jackets, backpacks, or uniforms—so the design remains legible and appealing when viewed from various angles and distances. In short, designing standout embroidered patches blends art, craft, and engineering.
Intro to the design process
At its core, designing standout embroidered patches revolves around a simple yet powerful framework: ideation, digitization, stitching, backing, and finishing. Getting this right requires attention to detail in both the creative and technical stages. This article emphasizes an embroidered patches design checklist that covers the essential decisions, practical tips, and common pitfalls to avoid.
1) Define purpose and audience
Before you draw the first stitch, ask: What is this patch for? Who will wear it, and under what conditions? A patch for a seasonal collection might prioritize bold color and high visibility, while a corporate badge may require subtler tones and a restrained shape. The audience determines scale, color palette, and the level of detail that will remain legible after production.
2) Choose the right size and shape
Size and shape punch above aesthetics in impact. Larger patches offer more space for storytelling and fine details, but they may be impractical for some garments. Smaller patches demand crisp lines and simplified motifs to maintain legibility. Consider common garment surfaces and er, stitching margins when selecting a shape—classic circles, shields, or custom contours can reinforce brand identity. The aim is to balance a distinctive silhouette with functional wearability. This balance is a critical element of the patch design process.
3) Materials and backing impact durability
Investing in quality materials pays dividends in longevity and finish. Typical patch bases include twill, felt, and felt-backed fabrics, each with different weight, texture, and drape. The backing option—iron-on, sew-on, or Velcro—affects usability and care. Iron-on backings are convenient but may require extra heat-setting for longevity; sew-on backings are the most durable but require extra sewing, while Velcro backings enable temporary attachment. When choosing materials, consider fabric weight, thread count, and the intended garment care to avoid peeling, fraying, or color bleed over time. This is where the decision often intersects with the ‘high-quality embroidered patches’ standard—careful material selection is foundational to quality.
4) Embroidery techniques that matter
Patch embroidery techniques define texture, density, and visual impact. A versatile patch uses a combination of stitching styles to optimize readability and durability:
– Satin stitch for bold outlines and smooth fills in simple shapes.
– Fill stitch for larger areas, using state-of-the-art digitizing to avoid gaps and thread breaks.
– Chenille or textured fills for a premium, tactile appearance.
– Satin borders or merrow edging to create a clean, finished edge that resists fraying.
– Underlay stitches to stabilize fabric and prevent fabric show-through.
This is where the patch becomes more than a picture—it becomes a tactile, durable piece. When you map out the embroidery, keep in mind the number of thread colors, stitch density, and underlay for stable results. The phrase patch embroidery techniques captures the core methods used to achieve precise, durable results.
5) Color theory and color management
Color is the most immediate element that readers notice. Use a limited, purposeful palette aligned with brand colors or theme. When possible, use Pantone-matched threads to minimize color shifts between batches. Ensure contrast is strong enough to be legible from a distance, especially for patches designed for outdoor use or on dark fabrics. Test color combinations on the actual patch material to account for fabric tint and stitching sheen.
6) Digitization and the custom embroidered patches design process
The best patches start with clean artwork and thoughtful digitization. A typical duotone or multi-color patch requires careful color mapping and stitch planning. The steps include:
– Finalizing vector artwork or clean raster design.
– Assigning stitch types and densities to each area, with attention to thread counts per design area.
– Generating underlay and edge stitches to stabilize the patch.
– Simulating fabric backing and patch edge to anticipate how the final piece will sit on the garment.
– Creating stitch tests to verify density, color coverage, and edge crispness.
Following this custom embroidered patches design process reduces revision cycles and ensures the file is production-ready.
7) Edge finish and backing details
Merrow edge, laser-cut, or heat-cut edges each yield different visual and tactile finishes. The edge choice influences durability and how the patch sits on fabric. A neat border can prevent fraying and give a finished aesthetic that complements the embroidery. For Velcro backings, ensure the adhesive area and hook side are compatible with the garment’s fabric to avoid snagging or wear.
8) Quality control and prototyping
Prototyping is where theories meet reality. Order a prototype batch to check alignment, density, and color accuracy under real wear conditions. Common issues include thread fraying, color bleed, puckering around edges, and misalignment of details. Use a patch testing protocol that includes washing, abrasion, and sunlight exposure to verify endurance.
9) Practical production considerations
A few pragmatic factors affect feasibility and cost:
– Minimum order quantity (MOQ) and unit cost versus run size.
– Turnaround times for production and potential rush fees.
– Die-cut vs laser-cut methods for sizing and shape fidelity.
– Quantity-based pricing on materials and backing.
– Sustainability considerations, such as recycled backing or eco-friendly threads.
Understanding these aspects helps you price patches accurately and avoid surprises when fulfilling orders. This is why a focused embroidered patches design checklist matters—it keeps production on track while preserving design intent.
10) Standout embroidered patches ideas and trends
Standout patches emerge from original storytelling and thoughtful motif selection. Ideas include vintage-inspired logos, retro sci-fi icons, nature motifs with bold color blocks, and modern minimalist patches using high-contrast outlines. For brands, a patch that tells a story—an emblem with a backstory, year markers, or a crest—can become a collector’s item. When exploring standout ideas, balance novelty with clarity; too much detail can blur at patch size, while a strong focal motif with supporting accents often reads best.
11) A designer’s checklist you can use today
To help you deliver consistently high-quality patches, use this practical checklist:
– Define purpose and audience and set patch size.
– Choose materials and backing appropriate for garment use.
– Decide on patch shape and edge finish.
– Plan embroidery techniques and color strategy.
– Digitize artwork with clean vector lines and color mapping.
– Create a production-ready stitch file with density and underlay.
– Produce a prototype for testing and validation.
– Review for readability, durability, and ease of application.
– Finalize packaging and labeling for distribution.
Conclusion
Designing standout embroidered patches is a craft that fuses storytelling, material science, and precise stitching into wearable branding. Clear purpose, appropriate materials, thoughtful embroidery techniques, precise digitization, durable edge finishes, and rigorous prototyping all contribute to patches that communicate a brand story and endure wear. By following a disciplined design checklist and prioritizing quality control, designers can create patches that look striking, stay legible, and perform well across different garments and conditions.