DIY embroidered design projects open a fresh, expressive way to personalize your space, inviting you to start small and dream big right from the first stitch. This hands-on approach blends textile craft with interior styling, transforming plain fabrics into statements that reflect your taste, stories, and seasonal moods. From soft, hand embroidered pillows to gallery-worthy wall pieces, you can build confidence with beginner-friendly stitches, affordable tools, and a careful color plan. For those seeking ideas to refresh a room on a budget, embroidered home decor ideas guide your palette, motifs, and layering decisions so every piece feels intentional. If you’re exploring embroidery project for beginners, consider how DIY embroidery wall art and home decor embroidery patterns can guide your first endeavors while still feeling fresh, personal, and proudly handmade.
From a search perspective, the topic aligns with LSI-driven terms such as stitched home accents, textile wall art, and handmade fabric decor that signal a cohesive home craft story. Readers can also explore needlework-based projects that blend color theory with texture, turning everyday textiles into unique wall hangings, cushions, and small organizers. Alternatives like decorative stitching projects for beginners, or fabric embellishment ideas for living spaces, help you capture the same spirit without repeating keyword phrases. To expand your palette, think in terms of motifs, color stories, and scalable projects—habits that translate well across pillows, wall hangings, and accessory pieces. In short, this content covers both the practical how-tos and the semantic signals that connect your embroidery journey to broader home decor trends.
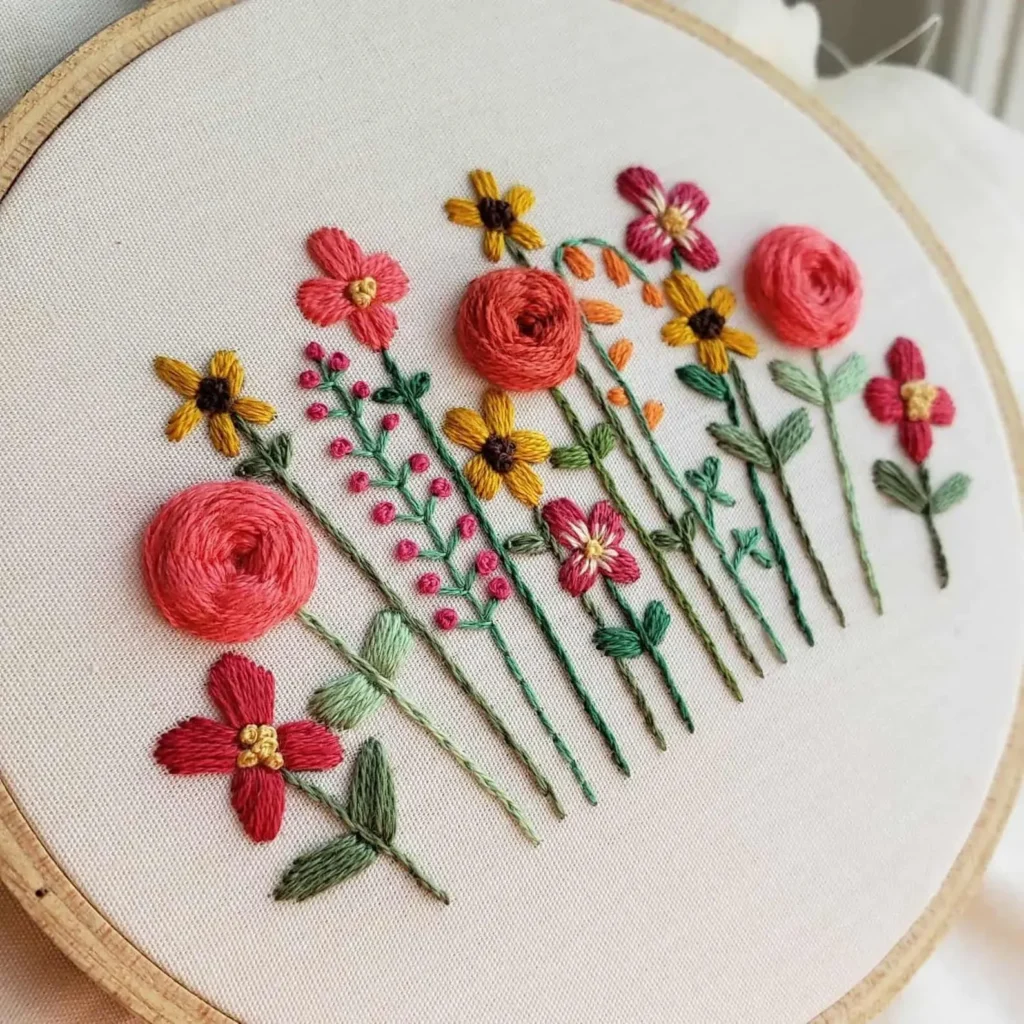
Pillows as Soft Canvases for Color and Texture
Pillows offer an inviting entry point into DIY embroidered design projects and act as soft canvases for color, texture, and personal expression. By starting with cotton, linen, or linen-blend covers, you give your stitches a crisp surface that makes hues read true. An embroidery hoop keeps the fabric taut and stitches even, helping you achieve polished results even on a forgiving textile like a pillow cover. For anyone exploring embroidered home decor ideas, pillows provide immediate decor payoff and a reliable path to skill-building.
Begin with simple motifs—geometric shapes, dashed lines, or single-word callouts—and gradually layer colors to create depth. Satin stitches can fill shapes with a smooth field, while backstitches define crisp outlines. If you want extra texture without overwhelming technique, try French knots or seed stitches as tiny details. Neutral pillow covers become anchor pieces on a sofa or bed, and as your confidence grows, you can apply more intricate motifs that align with your room’s design language and home decor embroidery patterns.
DIY Embroidery Wall Art: Elevating Walls with Stitched Statements
DIY embroidery wall art blends textile craft with interior design to transform walls with a tactile, handmade vibe. This approach suits a range of spaces, from modern living rooms to cozy nooks, and fits well with home decor embroidery patterns that repeat across accessories. When planning wall pieces, consider scale, color story, and lighting to ensure the stitched work reads as a cohesive design element rather than a separate craft project.
Start with a sturdy base such as heavyweight cotton or linen mounted in a deep wooden hoop or framed for a clean, gallery-ready finish. Transfer a simple silhouette or abstract form and choose high-contrast threads to make the motif pop. As you gain confidence, you can layer different stitches—satin for filled areas, split stitch for subtle shading, and backstitch for crisp contour lines—to add texture and dimension to your DIY embroidery wall art.
Accessories: Small, Strategic Pieces That Tie the Room Together
Small accessories offer frequent opportunities to practice new stitches and color palettes without committing to large panels. Tablet sleeves, decorative pouches, and coasters can be crafted with hand embroidery pillow techniques in mind, linking the look of your pillows, wall art, and other textiles. These tiny projects are a practical entry point for those pursuing embroidery project ideas for home renovation, delivering quick wins that still contribute to a cohesive aesthetic.
Choose fabrics that suit the accessory’s function—washable cotton for coasters, durable canvas for pouches, or sturdy felt for decorative hoops. Embroidered motifs can echo the larger patterns found on pillows or wall art, reinforcing a unified design language across a room. By balancing scale and color, you create a sense of continuity that makes even small details feel intentional and polished.
Stitches and Techniques for Affordability and Ease
A successful suite of DIY embroidered design projects relies on mastering a handful of versatile stitches. For beginners, focus on clean, even stitches and solid fabric handling rather than intricate patterns. Foundational stitches like backstitch, running stitch, satin stitch, French knot, and seed stitch provide robust building blocks for a broad range of home decor projects and are especially well-suited to hand embroidered pillows and wall art.
In addition to stitches, transfer methods help you work more efficiently. Light tracing with a fabric pencil, transfer papers, or iron-on sheets are beginner-friendly options that keep motifs proportionate. Securing your fabric in a hoop or frame reduces puckering and helps you maintain consistent tension, which makes your embroidered home decor ideas look professional even on simple surfaces.
Getting Started: Materials, Planning, and a Practical Project Path
For DIY embroidered design projects, begin with a compact kit: embroidery needles, a variety of floss or stranded cotton threads, a fabric hoop, scissors, and a few blank textile surfaces like pillow covers or small wall-hanging fabrics. Establish a color palette that harmonizes with your room, then plan rough motifs and a simple project path. This practical approach mirrors embroidery project for beginners guidance and keeps you motivated with visible, incremental results.
A practical route starts with pillows for quick wins, followed by a wall art piece, and then small accessories to reinforce momentum. Use nature-inspired leaves, geometric shapes, or monograms as motifs, and repeat a core color story across pieces to unify the space. With a clear plan, you’ll gain confidence quickly and begin to see how these elements translate into a cohesive, stylish home that reflects your personal taste and the larger home decor embroidery patterns you love.
Care and Maintenance: Keeping Embroidered Decor Vibrant for Years
To preserve the look of your DIY embroidered design projects, adopt gentle care routines that protect texture, color, and fabric integrity. Hand washing delicate pieces or using a gentle machine cycle with mild detergent helps minimize fraying and color bleed, while air drying flat keeps stitches from losing tension. If mounting embroidered panels in hoops or frames, avoid over-tightening and allow the fabric to relax after washing to prevent distortion.
Iron on a low heat setting with a pressing cloth to protect stitches, and handle all textiles—whether pillows, wall art, or accessories—with care. Regular maintenance, such as rotating pieces in shared living spaces and avoiding direct sunlight for extended periods, will help your hand embroidered pillows and other decor maintain their luster. With proper care, embroidered home decor ideas stay vibrant and inviting for years, making your handmade pieces enduring features in your home.
Frequently Asked Questions
What is a simple embroidery project for beginners within DIY embroidered design projects?
Begin with a embroidery project for beginners on a small pillow cover using a simple motif. Use a cotton or linen base, an embroidery hoop to keep fabric taut, and a limited color palette. For DIY embroidered design projects, start with basic stitches like backstitch and running stitch and gradually add more complex techniques as you gain confidence.
How can DIY embroidery wall art fit into embroidered home decor ideas?
Choose a sturdy base such as heavyweight cotton or linen and mount it in a hoop or frame for DIY embroidery wall art. Plan a bold silhouette or geometric motif and test color combinations on a swatch before stitching. This approach aligns with embroidered home decor ideas by creating a cohesive wall gallery.
Which stitches work best for hand embroidered pillows in DIY embroidered design projects?
For hand embroidered pillows, use backstitch for crisp outlines, satin stitch for filled areas, and running stitch for texture. Add French knots or seed stitches for subtle details, keeping the fabric taut with a hoop. These foundational stitches power your DIY embroidered design projects.
What supplies are essential to start DIY embroidered design projects for home decor embroidery patterns?
Essential supplies include a fabric hoop, sharp embroidery needles, stranded cotton floss, scissors, and a few pillow covers or textiles suitable for home decor embroidery patterns. Start with a small, simple motif and a limited palette to simplify transfers. As you grow, you can expand threads, fabrics, and patterns.
How can I use home decor embroidery patterns to create a cohesive set of DIY embroidered design projects across pillows and wall art?
Use home decor embroidery patterns to create a cohesive look by repeating motifs and sticking to a unified color story across pillows and wall art. Choose a couple of motifs (geometric shapes or botanical outlines) and keep scale balanced between pieces. Display a mix of pillows, wall art, and small accessories to reinforce the overall pattern in your DIY embroidered design projects.
What care steps keep DIY embroidered design projects looking fresh, especially for beginners working on hand embroidered pillows or wall art?
Care for DIY embroidered design projects by washing delicate pieces by hand or on a gentle cycle, then air drying flat. Avoid overloading hoops and iron on low heat with a pressing cloth to protect stitches. With proper care, hand embroidered pillows and embroidery wall art remain vibrant and durable for years.
| Section | Key Points |
|---|---|
| Introduction | Embroidery as a fresh, expressive way to personalize spaces; three core categories (pillows, wall art, accessories); approachable for crafters at all levels; blends craft with interior style; aims for affordable, rewarding home decor. |
| Pillows | Easy entry point with forgiving surfaces; materials like cotton/linen pillow covers; use embroidery hoop; beginner motifs (geometric shapes, lines, single words); stitches include satin (fills) and backstitch (outlines); add texture with French knots/seed stitches; consider pre-printed patterns for learning; coordinates well with room decor; scalable to more complex motifs. |
| Wall Art | Transforms walls with tactile dimension; base options: heavyweight cotton/linen in a hoop or frame; plan scale, color, lighting; motifs: geometric, botanical, abstract; stitches: satin, split, backstitch; start simple and layer for texture; pro tips: plan colors, test swatches, linen backing helps; creates cohesive gallery-style display. |
| Accessories | Small items like tablet sleeves, pouches, coasters; great for frequent stitch/color practice; fabrics chosen for use (washable cottons, durable canvas, felt); motifs can be symbols, seasonal motifs, or monograms; balance scale/color with decor; echo motifs from pillows/wall art for cohesion. |
| Stitches and Techniques | Foundational stitches: backstitch, running stitch, satin stitch, French knot/seed stitch, split stitch; transfer methods: fabric pencil, transfer paper, iron-on sheets; use gridded patterns for large pieces; keep fabric taut in a hoop/frame to minimize puckering. |
| Getting Started | Materials: needles, embroidery floss, hoop, scissors, cutting mat, blank textiles; plan a color palette; sketch ideas; recommended order: pillows first, then wall art, then accessories to show progress and build confidence. |
| Design Ideas & Patterns | Motifs like leaves, botanical outlines, geometric shapes, minimalist line drawings, florals, or monograms; limit palette to 2–5 colors; mix solid fills with line work; color story should reflect room function and personality; aim for cohesive repetition across pieces. |
| Care & Maintenance | Gentle care to preserve vibrancy: hand wash or gentle cycle; air dry; avoid heat on stitches; iron with a cloth; proper care extends life of pillows, wall art, and accessories. |
| Motivation | Start small, maintain color-coordinated thread sets, label/photograph progress, join online communities or local groups for support and troubleshooting. |
Summary
HTML table created to summarize key points from the base content about DIY embroidered design projects.