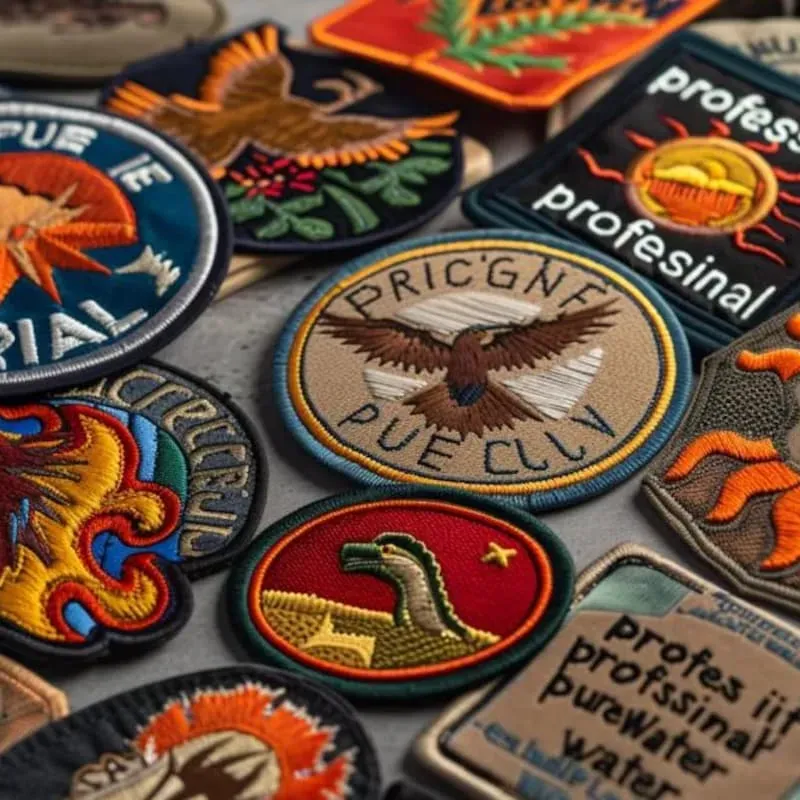
Custom Embroidered Patches let you wear your personality on your sleeve, turning ideas into tactile art. They celebrate interests, brands, clubs, or milestones in a compact, durable form. In this guide, you’re not just learning a craft—you’re building a tiny gallery you can display on jackets, backpacks, hats, or fabric accessories. You’ll discover practical steps for turning ideas into high-quality, durable designs. Ideas like DIY embroidered patches, how to create patches, patch collection ideas, embroidered patch designs, and sew-on patches intersect to make your work both beautiful and functional.
Alternative terms such as stitched emblems, fabric badges, and embroidered patches help frame the idea without repeating the product name. Think of these textile insignias as small, durable art pieces that attach to apparel or bags, often using different backings and edging. From a design perspective, you’re crafting miniature stories in thread, where color, texture, and silhouette communicate at a glance. Whether you call them sewn-on badges, appliqué patches, or decorative emblems, the core process—concept, design, digitize, stitch, finish—remains the same. Over time, this patchmaking journey can evolve into curated collections or collaborative releases that resonate with fans and makers.
1) Understanding Custom Embroidered Patches: From Concept to Craft
Custom Embroidered Patches are small fabric badges with stitched designs that can be attached to clothing or gear. They combine texture, color, and durability to create a compact form of personal expression. When you explore how to turn an idea into a patch, you’re balancing readability at small sizes with the artistry of embroidered patch designs. This is where the craft shines: a simple concept becomes a wearable piece of art that endures through washing and wear.
Embracing the world of DIY embroidered patches means recognizing the intersection of design, technique, and material choice. By thinking about visual clarity, edge finishing, and backing stability, you’ll create patches that read well on fabric and stay intact over time. This overview also sets up the framework for discussing DIY processes, from the initial concept to the final finished patch, including how to create patches that align with your creative goals.
2) Plan a Patch Collection: Themes, Narratives, and Patch Collection Ideas
A well-planned patch collection reads like a compact portfolio of your interests. Start with patch collection ideas that build a narrative—travel motifs, music vibes, sports affiliations, or club identities—then group them by color story or storyline. The aim is to curate a cohesive set that feels intentional, whether you display them on a board, jacket, or binder. This planning phase echoes the way professional embroidered patch designs are tested for balance and readibility across multiple sizes.
As you map out your collection, consider how sew-on patches and iron-on options could complement each other. A themed group with consistent borders, backing choices, and color palettes helps each patch contribute to the larger story. The result is a wearable library of moments that fans, friends, or club members can collect, trade, and wear with pride.
3) From Concept to Stitch: How to Create Patches
If you’re asking how to create patches, begin with a clear concept and a few thumbnail sketches. Choose a strong composition that holds up when reduced to patch size, then digitize the design so stitching instructions can be generated. This stage blends artistry with practical technique, ensuring you can translate an idea into an embroidered patch design that remains legible and stylish.
Next comes the technical path: selecting thread colors, stabilizers, and backing that suit the fabric and intended wear. For DIY embroidered patches, you’ll often digitize artwork yourself or partner with a service to translate your sketch into stitch data. The goal is to maintain color accuracy, stitch density, and edge finish so your patches look polished from concept to finished product.
4) DIY Tools and Materials for Embroidered Patches
Your patch-making toolkit centers on accessibility and durability. A basic setup might include an embroidery machine, stabilizers, embroidery threads, and appropriate backing material. Stabilizers help prevent puckering, while thread choices should prioritize colorfastness and wash durability. This is where the practice of DIY embroidered patches—starting with simple shapes and a limited color palette—meets scalable design as you gain experience.
Backing and edging choices also shape how patches perform in the real world. Sew-on patches provide durability and lasting adhesion through stitching, while iron-on options offer quick application with heat. Edging—such as merrow or satin—reinforces the perimeter and enhances the patch’s finished look. The materials you pick will influence how well the patch survives washing and regular wear.
5) Backing, Edging, and Finishing: Choosing Sew-On Patches or Iron-On Patches
Choosing between sew-on patches and iron-on patches affects both application and longevity. Sew-on patches tend to be the most durable option for jackets, bags, and rugged fabrics, making them ideal for everyday wear and long-term collections. Iron-on patches, while convenient for quick projects, may require careful heat settings and fabric compatibility to preserve adhesion after washing.
Finishing details—like merrow edging, satin borders, or tightly stitched outlines—play a crucial role in legibility and durability. The backing type you select should align with how the wearer intends to attach the patch and how it will be cared for during washing. A well-chosen finish not only enhances the patch’s aesthetic but also helps sustain its size, shape, and color over time.
6) Display, Storage, and Growth: Turning Ideas into a Patch Collection
Turning patch ideas into a tangible collection starts with thoughtful display and storage. Consider patch collection ideas for organizing by theme, size, or color, using labeled binders or a display board to make the collection easy to browse. A clear presentation helps you appreciate the story your patches tell and makes it easier to expand the collection over time.
Care and growth go hand in hand. Store patches away from direct sunlight to prevent fading, inspect for loose threads, and re-edge as needed to maintain a polished look. As you continue to develop your patch collection, keeping a record of sizes, colors, and backing types will support consistency across future embroidered patch designs and help you scale your hobby into a small, well-curated line.
Frequently Asked Questions
What are Custom Embroidered Patches, and how do DIY embroidered patches relate to them?
Custom Embroidered Patches are small fabric badges with embroidered designs stitched onto a backing and finished with a tidy edge. DIY embroidered patches let you experiment at home or in small runs, using stable stabilizers and durable threads to create patches you can wear on jackets, backpacks, or hats.
How to create patches: what are the key steps for Custom Embroidered Patches?
Start with a clear concept, then sketch variations and select the strongest composition. Digitize the design or work with an embroidery service that can translate artwork into stitch instructions, choose a backing, and finish with a suitable border (such as merrow edging) before production.
What embroidered patch designs work best for Custom Embroidered Patches?
Prioritize legibility and bold outlines to keep details readable at small sizes. Use strong color contrast, simple shapes for clarity, and ensure any text remains readable after stitching to create effective embroidered patch designs.
What patch collection ideas can guide the development of sew-on patches in a Custom Embroidered Patches project?
Think in themes (travel, music, sports), seasons, or narrative arcs. Patch collection ideas can help you build a cohesive set of sew-on patches that tells a story, showcases a color story, or supports limited-edition releases.
What materials and tools do I need for DIY embroidered patches in a Custom Embroidered Patches project?
A basic setup includes an embroidery machine, stabilizers, embroidery threads, backing material, and a method for finishing edges. For beginners, start with simple shapes and gradually add colors, and consider merrow edging for a durable, professional look.
How should I choose backing and finishing for sew-on patches within a Custom Embroidered Patches line?
Sew-on patches are the most durable option for jackets and bags, while iron-on backs can offer quick wear. Merrow edging provides a clean border, and the backing choice should align with how wearers are expected to attach the patch in your Custom Embroidered Patches project.
| Aspect | Key Points |
|---|---|
| What are Custom Embroidered Patches? | Small fabric badges with embroidered designs, edged to finish (merrow or satin), backed for stability. They range from logos to art pieces; durable for daily wear; balance color, detail, and legibility. |
| Why build a patch collection? | A patch collection acts as a portable portfolio and wearable story, offering durability and versatility across fabrics. It supports themed narratives and can be a display of interests, brands, clubs, or moments. |
| Key terms you’ll encounter | Embroidery-focused designs; sew-on vs iron-on backing; DIY embroidery; digitizing artwork; backing and edging types. |
| How to create patches: a practical approach | Start with a clear concept, sketch variations, then digitize or work with an embroidery service to translate artwork into stitch instructions. Choose colors based on fabric, thread availability, and patch use. For DIY projects, pick sturdy fabrics and stabilizers, and decide on backing (satin, merrow edge, or heat-seal) that fits your goal. |
| A step-by-step path to your first patch collection | Step 1 — Concept/theme; Step 2 — Design brief; Step 3 — Digitize and test; Step 4 — Choose backing; Step 5 — Production; Step 6 — Finishing; Step 7 — Display and store; Step 8 — Quality control. |
| Design considerations for embroidered patch designs | Embroidery excels at texture and color. Ensure legibility for small patches with bold outlines and strong color contrast. If text is present, keep it readable at patch size; simplify fine lines to preserve identity after stitching. Balance clarity with character. |
| Materials and tools for DIY embroidered patches | Embroidery machine, stabilizers, embroidery threads, backing material, and finishing tools. Stabilizers prevent puckering; backing options include sew-on fabric, heat-seal backing, or iron-on adhesive. Use colorfast, durable threads and start simple before adding complexity. |
| Finishing and backing: sew-on vs iron-on | Sew-on patches are the most durable and suit jackets, backpacks, and denim. Iron-on patches are easier to apply but may need fabric-friendly adhesive and careful heat. Merrow edging offers a clean border; backing choice affects washing durability and user experience. |
| Display, storage, and care tips | Organize with labeled binders or display boards; store away from direct sunlight to preserve color. For iron-ons, follow backing care. Regularly inspect for fraying and resew or re-edge as needed to keep patches looking cohesive. |
| Quality, reproducibility, and growth | Test stitching density and colorfastness; if scaling, use embroidery services that offer consistent color matching and machine settings. Document designs (size, colors, backing) to ensure future patches align with the collection’s aesthetic. |
| Next steps and customization opportunities | Explore customization: limited editions, club patches, or seasonal releases; partner with artists or small brands; start with a small catalog and test market interest before larger runs. The core idea is intentional, well-crafted Custom Embroidered Patches. |
Summary
This HTML table summarizes the key points about Custom Embroidered Patches from the provided base content, highlighting definitions, processes, and practical guidance for creating and curating a patch collection.