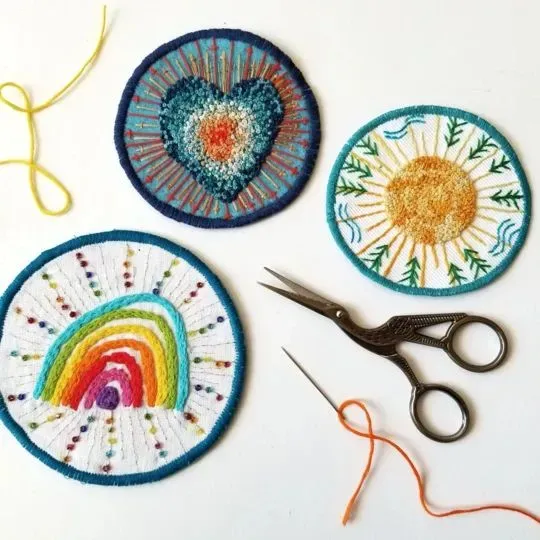
DIY Embroidered Patches open a world of wearable art, letting you customize jackets, bags, and hats with personal flair. This beginner-friendly guide walks you through simple steps, from gathering materials to the finishing touches, so you can confidently create professional-looking patches. You’ll learn patch embroidery techniques that yield durable fills and crisp outlines, even if you’re starting with embroidery patches for beginners. If you want to know how to make embroidered patches, this DIY patch tutorial covers design, transfer, stitching, and finishing with practical tips. With approachable projects and clear guidance, you’ll gain the confidence to create custom embroidered patches you’ll wear or gift.
From a broader perspective, these textile embellishments—sewn-on badges, fabric patches, and embroidered patches—offer a hands-on way to personalize gear. By thinking in terms of fabric embellishments, accessory patches, and hand-stitched or machine-stitched badges, you can apply the same principles across clothing and bags. This broader framing aligns with related concepts like patch embroidery techniques, DIY patch tutorial, and how to make embroidered patches, helping readers connect with the material in a natural way. Whether you call them embroidered badges, fabric patches, or looped-on embellishments, the core ideas remain the same: design, transfer, stitches, and finishing to create durable, stylish patches.
DIY Embroidered Patches: A Beginner’s Path to Creative Personalization
DIY Embroidered Patches open a world of personal expression, and this beginner-friendly guide makes the process approachable for those just starting with embroidery patches for beginners. You’ll learn essential steps—from selecting materials to finishing touches—so you can confidently create patches that sit nicely on jackets, backpacks, or hats.
Starting with a simple project helps build confidence quickly. This DIY patch tutorial emphasizes practical, repeatable steps, a calm workspace, and core skills you can apply to future projects, including custom embroidered patches. With patience and practice, you’ll see how a few stitches translate into wearable art that reflects your style.
Choosing Materials and Tools for Your First Embroidered Patches
Choosing the right base, hoop, threads, and stabilizer is the foundation of success for embroidery patches for beginners. Start with a sturdy fabric patch or scrap, a small tight hoop, a limited color palette, and quality embroidery floss. Getting these basics right keeps the stitching smooth and reduces frustration as you learn.
Understanding how each tool supports patch embroidery techniques helps you plan designs more effectively and makes learning how to make embroidered patches feel natural rather than daunting. As you practice, you can gradually expand your toolkit and palette to explore more complex textures.
Design Selection and Transferring Your Patch Pattern
Design selection sets the tone for your patch. Begin with simple silhouettes like hearts, stars, or geometric forms that are forgiving for beginners while you practice even stitches. This step is a common feature of many DIY patch tutorials and helps you visualize how the finished patch will look on fabric.
Transferring your design to fabric is approachable: transfer paper, a fabric pen, or light pencil lines work well on patch bases. If you’re patching clothing, stabilizing the back with tear-away or iron-on stabilizer keeps the surface flat and makes your first attempts look crisper.
Basic Stitches and Techniques You Need for Great Patches
Mastering a handful of stitches unlocks most patch projects. Focus on backstitch for outlines, satin stitch for fills, and add texture with split stitch or French knots. These patch embroidery techniques form the backbone of your beginner toolkit and deliver reliable, clean results.
Practice workflow: outline first, then fill, and finally add shading by layering threads. Keep stitch lengths consistent and work in small sections to avoid gaps, so your patches look polished as you learn how to make embroidered patches.
Finishing, Backing Options, and Attaching Your Patch
Finishing matters as much as sewing. Trim stray threads, secure any stabilizer, and decide how you’ll seal the edge—simple zigzag or a neat satin edge around the border. These finishing touches help your patch stay durable whether you sew or iron it onto your garment.
Choosing between iron-on backing and sew-on patches affects longevity. Iron-ons are quick for beginners, but may peel with washing; sew-on options take a bit more time but tend to hold up well on denim and bags. Knowing your project goals helps you decide which method best suits your needs for custom embroidered patches.
Creative Project Ideas: From Monograms to Themed Patches
Creative project ideas let you apply what you’ve learned in meaningful ways. Start with monograms, then floral or geometric patches to reflect your personality. These concepts translate well into custom embroidered patches for backpacks, jackets, or gifts.
As you gain confidence, scale up to larger patches, layer textures, and combine stitches to create depth. The same patch embroidery techniques you practiced in this guide become the building blocks for a broader range of custom embroidered patches.
Frequently Asked Questions
What are DIY Embroidered Patches and who should try embroidery patches for beginners?
DIY Embroidered Patches are handmade fabric decorations created by stitching designs onto a base to customize clothing and accessories. They’re ideal for beginners because you can start with simple shapes, basic stitches, and a small hoop, building confidence as you go in embroidery patches for beginners.
How to make embroidered patches: what basic supplies and steps does a DIY patch tutorial cover?
Key supplies include a patch base, an embroidery hoop, embroidery floss, needles, scissors, stabilizer, and optional backing. In a typical DIY patch tutorial, you transfer a simple design, outline with backstitch, fill with satin stitch, add shading, finish the edge, and attach the patch.
What patch embroidery techniques should beginners focus on when creating DIY Embroidered Patches?
Focus on core techniques: backstitch for outlines, satin stitch for fills, running stitch for shading, and add texture with split stitch or French knots for accents. These patch embroidery techniques help you achieve clean edges and solid fills suitable for beginners.
How should I choose a design and transfer it for embroidery patches for beginners in a DIY patch tutorial?
Choose a simple silhouette (heart, star, geometric) and limit your color palette to 2–4 colors to practice stitches. Transfer the design using transfer paper or a light pencil, center it on the patch base, and stabilize the back to keep stitches even.
What are the best finishing and application methods for DIY Embroidered Patches: iron-on vs sew-on?
Finish the patch by trimming threads, stabilizing the back, and securing the edge with a zigzag or satin border. For application, iron-on backing is quick but may wear with washing; sew-on patches tend to last longer on fabrics that endure frequent wear.
What starter project ideas exist for custom embroidered patches and what mistakes should beginners avoid?
Try a monogram, simple floral, geometric shapes, or a themed patch to express your style. Common mistakes include skipping stabilizer, pulling threads too tight, uneven stitches, and not practicing enough—avoid them by starting small, practicing on a swatch, and maintaining even tension.
| Aspect | Key Point | Notes |
|---|---|---|
| Introduction | DIY Embroidered Patches bring wearable art; beginner-friendly guide covers materials, steps, finishing, and personal expression. | Beginner-friendly; emphasizes practical outcomes and expressing personal style. |
| Materials & Tools | Patch base, embroidery hoop, floss, needles, scissors/pen, stabilizer, backing (optional), iron-on option, pins. | Organize a simple starter kit and maintain an orderly workspace. |
| Design & Transfer | Choose simple shapes; limit palette to 2–4 colors; transfer with paper/pen or light sketching; stabilize back if needed. | Aim for clear silhouettes and balanced color planning. |
| Stitches & Techniques | Backstitch outlines, running stitch shading, satin stitch fills, split stitch texture, French knots for accents. | Master a core set of stitches to cover common patch needs. |
| Step-by-Step Process | Outline with backstitch; fill with satin stitch; add shading; finalize with fine details. | Follow a consistent sequence for a polished finish. |
| Backing, Finishing & Attaching | Stabilize the back; trim stabilizer; edge with zigzag; attach by sewing or iron-on backing per instructions. | Durable patches with neat edges and secure attachment. |
| Iron-On vs Sew-On | Iron-on is quick but may peel; sew-on is durable, especially for denim and frequent wear. | Choose based on use-case and care requirements. |
| Projects | Monogram, Floral, Geometric shapes; themed patches for hobbies or characters. | Start with simple, repeatable designs to build confidence. |
| Common Mistakes | No stabilizer, overpulling threads, uneven stitches, skipping practice. | Practice on small swatches to build muscle memory. |
| Keywords & SEO | Embroidery patches for beginners, how to make embroidered patches, DIY patch tutorial, patch embroidery techniques, custom embroidered patches. | These phrases aid discoverability for future tutorials. |
| Conclusion | Summarizes core ideas and practical outcomes for DIY Embroidered Patches. | A concise recap that reinforces skills and inspires ongoing practice. |
Summary
DIY Embroidered Patches open a world of personal expression, turning simple fabric into wearable art through a hands-on, approachable process. This guide walks you through gathering the right materials, selecting beginner-friendly designs, and mastering essential stitches, finishing techniques, and attachment options, so you can create durable patches with clean edges and vibrant fills. By following a step-by-step approach, beginners build a solid embroidery foundation that scales to more complex projects and longer-term creativity. The patches you craft are portable and versatile, ready for jackets, backpacks, hats, or wall displays, making the skills you learn widely applicable across your craft.