custom shirts sizing and fit define how sharp a shirt looks and how comfortably it wears throughout the day. A precise approach to measuring, guided by clear guidelines, helps you choose the right size with confidence. This introduction draws on practical steps, common pitfalls, and actionable advice you can apply whether you’re shopping online or visiting a tailor. You’ll learn about neck and sleeve considerations, how fabrics influence fit, and the balance between ease and motion. With consistent methods and mindful selection, you’ll move toward a wardrobe where your shirts feel tailored and comfortable.
Beyond the numbers, the art of a well-fitting shirt rests on how fabrics drape over the shoulders and how the silhouette harmonizes with your frame. This perspective aligns with practical terms like built-in ease, neck comfort, sleeve length, and shoulder balance, which guide your pattern selection. When you reference a custom shirt sizing chart, you’re translating body data into a garment plan rather than chasing a single number. Fabrics with stretch or stiffness shift the feel of a shirt, so you calibrate your expectations for fit by trying different textures and cuts. If you’re unsure, consult tips on how to measure for shirts or explore shirt fit tips to refine your approach.
Custom Shirts Sizing and Fit: Establishing Baseline Measurements
Custom shirts sizing and fit starts with a reliable baseline. To translate measurements into a comfortable, flattering garment, you’ll want to capture chest, waist, shoulder width, neck, and sleeve length with consistency and care. This aligns directly with how to measure for shirts, ensuring you’re reading numbers that reflect real-world movement and posture rather than a static pose. Begin by using a soft measuring tape, standing up straight with a relaxed posture, and repeating each measurement a couple of times to confirm accuracy. When you record these numbers, add a note about your preferred ease—whether you favor a closer than usual fit or a bit more room in the chest and shoulders. The phrase custom shirts sizing and fit highlights that precision here is a prerequisite for long-term comfort and sharp appearance.
Once you have your baselines, you’ll be ready to consult a shirt sizing guide and apply your data to a sizing map. This first step isn’t just about numbers; it’s about understanding how your silhouette aligns with shoulder lines, sleeve length, and torso balance. A consistent baseline helps you avoid common issues like gaping at the chest or sleeves that are too long. When you maintain accurate measurements and record them, you create a personal reference that informs future purchases and tailoring decisions, whether you’re buying a completely custom shirt or adjusting a standard pattern to your measurements.
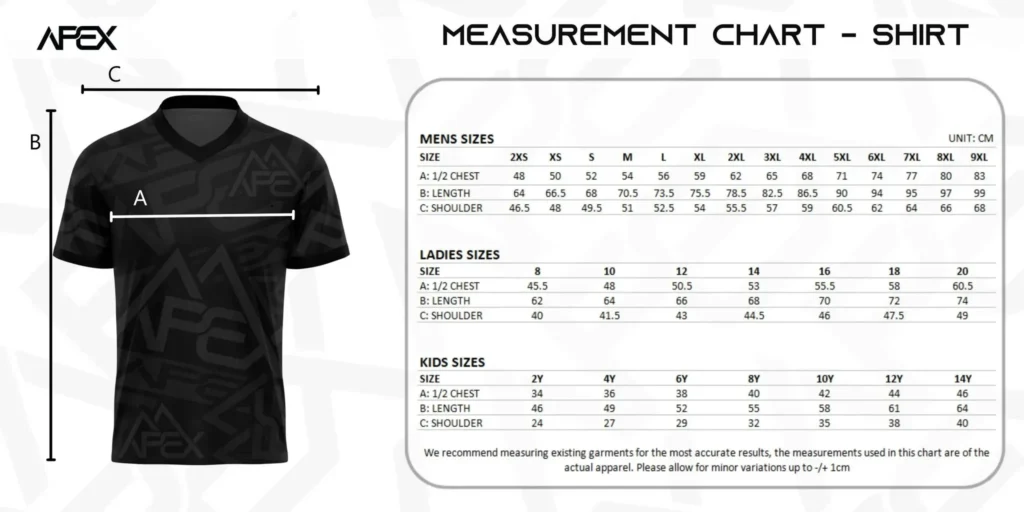
Using a Shirt Sizing Guide to Map Your Measurements to Size
A thorough shirt sizing guide functions as a bridge between your numbers and the garment you’ll wear. It consolidates key dimensions such as chest and waist, neck circumference, and sleeve length, then relates them to fit notes like slim, regular, or classic. This is where the terms how to measure for shirts and shirt sizing guide converge, giving you a practical method to translate data into the right size. By reviewing the guide, you can see how close your measurements sit to a given size and decide whether you need a more generous cut or a trimmer silhouette.
As you compare your measurements to the guide, be mindful that different brands may use slightly different grading. The goal is to identify a size that aligns with your most critical fit zones—the shoulders, chest, and neck—while maintaining comfort in the torso. If your chest sits between sizes, lean on your preferred ease and the guide’s notes about fit. In this phase, you’ll develop a sense for the perfect shirt size that suits your day-to-day activities and chosen style, all while using the shirt sizing guide as a steady reference.
Decoding the Custom Shirt Sizing Chart for Your Best Fit
The custom shirt sizing chart takes your measurements and aligns them with specific size recommendations, including the combination of chest, waist, neck, and sleeve lengths. This is where terms like custom shirt sizing chart come into play, offering a precise map to your ideal size. When you study the chart, look beyond the number and pay attention to fit notes (slim, regular, classic) and fabric type, which can influence how a given size feels in practice. The goal is to land on a size that minimizes fabric pooling and avoids pulling at the buttons, while still respecting your preferred silhouette.
Remember that no two brands fit identically, and the chart is a guide rather than a guarantee. Use the chart to select your best starting point, then verify with real-world checks (movement, reaching, bending). If you’re between sizes, consider the chart’s guidance on ease and the garment’s intended use. A well-understood custom shirt sizing chart empowers you to command the right size across different collections and fabrics, helping you achieve the perfect shirt size in practice.
Fit by Style: Slim, Regular, and Classic and How They Shape Your Size
Your choice of style dramatically affects how measurements translate into a comfortable, flattering fit. A slim/modern cut follows your natural lines with less ease, a regular fit offers a reliable balance of room and comfort, and a classic fit provides more generous proportions for broader shoulders or a fuller chest. This is where the shirt fit tips come into play: your chest and waist measurements will interact with the chosen style to determine the final size. If you’re after a contemporary look, you might favor a smaller neck and slightly longer sleeves to prevent bunching.
For a versatile wardrobe, the regular fit is often a safe starting point, while the classic fit can accommodate body types with more proportion or activity that calls for greater ease. When shopping online, compare the stated fit in product descriptions with your measurements, and consider whether a brand’s “slim,” “regular,” or “classic” labels align with your personal fit benchmark. If you’re between sizes, the style choice can be as important as the number on the tag, and tailored adjustments can seal the deal on a perfect shirt size.
Fabric, Stretch, and Their Impact on Sizing and Comfort
Fabric choice reshapes how a shirt wears and feels, influencing the selection of size. Fabrics with stretch—such as cotton blends with Lycra or elastane—offer more forgiveness and may permit a slightly trimmer size for comfort during movement. Non-stretch fabrics, like 100% cotton or linen, can be stiffer and less forgiving after washing, making it important to accommodate future wear with an appropriate size. When you’re determining the perfect size, consider how fabric elasticity might change fit over time and in different conditions.
If you anticipate a lot of arm movement or layering, stretch fabrics can reduce tension around the chest and shoulders, supporting a comfortable range of motion. Conversely, non-stretch fabrics can emphasize the importance of a precise baseline measurement and perhaps a tailor’s input to adjust sleeve or torso lengths. By factoring fabric characteristics into your sizing decisions, you’ll improve both fit and long-term wearability, achieving a more consistent, flattering silhouette.
Testing Fit, Adjustments, and Tailoring for a Perfect Shirt Size
Great fit is proven through movement tests and practical checks. Start with the basics: the chest should read with a touch of ease, the shoulder seam should align with your shoulder edge, and the sleeves must permit full range of motion without twisting or pulling at the elbow. This is where the practical mindset of shirt fit tips comes in: look for signs of tightness, bunching, or sagging and plan adjustments accordingly. If you notice issues, you may need to revisit your size choice or consider minor tailoring.
Tailoring can elevate a good fit to a near-perfect one. Small changes like taking in the waist, adjusting the collar, or shortening sleeves can make a substantial difference in comfort and silhouette. For ongoing improvement, maintain a fit notebook that records which shirts fit best and what alterations were made. This habit helps you continually dial in the perfect shirt size across brands and styles, reinforcing the idea that custom shirts sizing and fit is an ongoing process rather than a one-time result.
Frequently Asked Questions
How can I use a shirt sizing guide to find the perfect shirt size for custom shirts sizing and fit?
A shirt sizing guide translates your measurements into size choices by reading chest, waist, neck, and sleeve length ranges. Start with your chest and check fit notes such as slim, regular, or classic to guide your choice. If you’re between sizes, pick the option that aligns with your preferred fit, and consider tailoring later for a truly perfect shirt size.
What is a custom shirt sizing chart and how does it map my measurements to the right size for custom shirts sizing and fit?
A custom shirt sizing chart lists size-specific measurements (chest, waist, neck, sleeve length) and notes on fit. Compare your numbers to the chart to identify the closest size, then adjust for your preferred silhouette (slim, regular, classic). Remember that different brands vary, so use your measurements as a bridge to the right size and consider your fit goals.
How to measure for shirts at home to ensure accurate sizing in custom shirts sizing and fit?
Follow a repeatable method: measure chest, neck, shoulders, sleeve length, and waist/torso length with a soft tape, wearing lightweight clothing or measuring over skin. Keep the tape flat and parallel to the floor, taking multiple readings to confirm accuracy. Use these baseline numbers to map to your shirt sizing guide or sizing chart.
What are essential shirt fit tips to avoid common issues and ensure the perfect shirt size?
Key shirt fit tips include ensuring the collar is snug but breathable, the shoulder seam sits on the shoulder, and sleeves allow full range of motion without bunching. Check chest and waist ease to prevent gaping or tightness, and use tailor adjustments for a near-perfect shirt size when needed. A good fit also means choosing a sleeve and torso length that matches your daily activities.
How does fabric choice and stretch influence the size you choose in custom shirts sizing and fit?
Fabric stretch affects sizing: stretchy blends can allow a slightly trimmer size, while non-stretch fabrics may require a roomier cut to avoid pulling. Consider wash shrinkage and planned wear when selecting your size on the shirt sizing guide or chart for a comfortable, true fit that still looks sharp—your perfect shirt size may shift with fabric.
How can I test fit and adjust for the best fit in custom shirts sizing and fit?
Test fit by moving through typical actions—reach, bend, and sit—while checking that the chest reads comfortably, shoulders align, and sleeves don’t pull. If issues appear, try a different size or consult tailoring for adjustments like the collar, waist, or sleeve length. When possible, order two sizes with easy returns to dial in the best custom shirts sizing and fit.
| Aspect | Key Points |
|---|---|
| Establish baseline measurements | – Baseline includes chest, waist, shoulder width, neck, sleeve length. – Use a soft measuring tape. – Stand up straight, relax posture, and take measurements a couple of times to confirm accuracy. – Wear lightweight clothing or measure on bare skin for accuracy. – Tape should lie flat and be parallel to the floor. – Translate measurements to a sizing chart if available. |
| How to measure for shirts (practical method) | – Chest: around fullest part, tape horizontal, snug but not tight. – Neck: base of neck with added ease for comfort. – Shoulders: from one shoulder seam to the other across back. – Sleeve length: center back to wrist, with a little ease. – Bicep: around fullest part of upper arm. – Waist/Torso length: at natural waist; decide untucked vs. longer length. – Hem/back length: measure from shoulder seam to desired front/back hem. – Always measure with tape flat and parallel; repeat measurements for accuracy. |
| Understand sizing charts and mapping to fit | – Sizing charts map chest, waist, neck, sleeve lengths to fit notes (slim/regular/classic) and fabric type. – Compare chest to chart range; if between sizes, choose based on preferred fit. – Slim/modern reduces chest/midsection; classic offers more ease. – Sleeve and torso length indicators matter. – Brands vary; use multiple references or a measured shirt you own as a benchmark. |
| Fit by style | – Slim/modern: follows body lines with minimal excess fabric; smaller neck with longer sleeves often. – Regular: balanced ease in chest and waist; versatile safe starting point. – Classic: broader shoulders, more chest room, longer torso; drapes more gracefully. – When shopping online, check product fit notes and compare with your measurements. If between sizes, consider regular or classic and tailor as needed. |
| Fabric, stretch, and how they influence size | – Stretch fabrics (cotton blends with Lycra/elastane) offer forgiving fit and movement; you may choose a trimmer size. – Non-stretch fabrics (100% cotton/linen) can feel stiff and less forgiving; sizing up or choosing classic may help. – Consider elasticity when deciding size for comfort and movement. |
| Special zones — collar, cuffs, and sleeve heads | – Collar should be snug but breathable; aim for about one finger’s width of ease. – Cuffs should fit around the wrist without tightness in rest or movement. – Shoulder seam should align with shoulder bone; sleeve head should lie flat without puckering. – If wearing a tie, factor in a larger neck measurement; for rolled-up sleeves, allow extra sleeve length. |
| How to test fit and what to adjust | – Stand straight: chest should have ease without pulling at buttons. – Shoulder seam should align with shoulder edge. – Sleeves should allow full range of motion with no twisting or pulling. – Hem should sit evenly around hips; untucked hems should look balanced. – If issues persist, tailor or adjust size (collar, waist, sleeves) for better fit. |
| Practical tips for achieving the perfect size | – Use a flexible tape and verify flat against torso; verify with a mirror. – Keep a notebook of measurements and fit notes. – Create a fit benchmark by comparing shirts that fit well. – When possible, order two sizes and return the one that doesn’t fit. – Consider tailoring for minor adjustments to collar, cuffs, and sleeve length. |
| Why tailoring is part of the sizing journey | – Tailoring can refine the silhouette and improve comfort; off-the-rack sizes are a good starting point but adjustments ensure a refined look. – Tailoring is practical for collar, cuffs, and sleeve length to ensure a true custom feel. |