DIY Patch Tutorial reveals a practical, step-by-step approach to upgrading worn jeans, jackets, backpacks, and hats. This guide covers easy techniques for patch sewing, from choosing the right backing and threads to aligning designs for a clean, durable finish. Whether you use iron-on patches for a quick fix or opt for sew-on patches for lasting wear, you’ll learn tips that minimize puckering and popping stitches. You’ll also find practical checks for placement, stitch choice, and edge finishing. With patience and a little practice, this method helps you repair, customize, and refresh garments with confidence, even if you’re new to sewing.
Viewed through broader terms, this topic resembles fabric embellishments and appliques rather than a single patch. Think of embroidered patches, fabric badges, or garment embellishments, all of which share the goal of adding personality while reinforcing fabric. The discussion leans on durable attachment methods, backing choices, and edge finishes, whether you stitch by hand or with a machine. This is an LSI-informed approach that uses related terms to mirror user intent, including heat-activated options, sewing techniques, and care practices. By framing the guide around repair strategies, denim revival, and fabric protection, you glimpse how the core steps translate across different fabrics and projects.
DIY Patch Tutorial Essentials: From Prep to Finish for Patch Sewing Success
The DIY Patch Tutorial is a practical, hands-on guide to patch sewing that walks you from fabric prep through finishing touches. It covers patch types, backing choices, stitch options, and care tips so you can achieve durable results that look great on denim, jackets, backpacks, or hats. By understanding the full process, you’ll learn how to apply patches with confidence, whether you’re using iron-on patches for speed or sew-on patches for long-lasting wear.
Starting with essential materials and tools, this guide emphasizes the importance of selecting patches that suit the fabric and intended look. You’ll find guidance on choosing thread, needles, stabilizers, and heat protection for iron-on patches, all while keeping denim patch repair and rugged fabrics in mind. The aim is to equip you with a complete setup so you can tackle any patch sewing project—big or small—with clarity and control.
Iron-On Patches vs Sew-On: Choosing the Right Method for Your Fabric
Iron-on patches offer quick embellishment and a fast fix, making them ideal for lighter fabrics or when you want a non-permanent, removable option. This method relies on heat-activated adhesive, so understanding heat settings and surface preparation is key to a lasting bond. When selecting between iron-on patches and sew-on options, consider the fabric type, the garment’s washing routine, and how aggressively the item will be used.
Sew-on patches provide superior durability, especially in high-wear areas or items that endure frequent washing. By stitching around the edges, you control thread color, stitch length, and the overall strength of the attachment. This approach is particularly favored for denim patch repair and heavy fabrics, where long-term performance matters more than speed. In both cases, you’ll want to integrate patch application tips to maximize longevity and minimize edge lifting.
Patch Installation Planning: Placement, Backing, and Stitch Styles for Long-Lasting Repairs
Before you stitch, plan the patch placement carefully. Position the patch in relation to the garment’s curves and seams, then mark edges with pins or fabric chalk to ensure precise alignment. Consider proportion: a patch that’s too small can look out of place, while an oversized patch may restrict movement. Planning also involves selecting backing or stabilization to prevent fabric distortion, especially on delicate textiles.
Choosing the right stitch style is crucial for durability. A blanket stitch or a dense zigzag provides strong perimeter security and helps control fabric stretch, while a simple running stitch may be sufficient on stable fabrics. For denim and canvas, a wider zigzag often yields a robust finish. By pairing thoughtful placement with the appropriate stitch choice, you’ll create patches that stay put through countless washes and wear.
How to Sew Patches: Step-By-Step Techniques for a Durable Finish
Sewing patches starts with prep: clean the area, trim frayed edges, and secure the patch so it won’t shift. Whether you’re hand stitching or using a sewing machine, baste the patch to hold it in place, then select a stitch that balances durability and appearance. A mid-weight universal needle and sturdy thread are typically appropriate for denim and cotton fabrics.
When you stitch, begin from the garment’s underside to hide knots and maintain a clean surface. Choose a stitch around the edge—blanket, zigzag, or a dense satin stitch—depending on fabric and desired look. Keep stitches evenly spaced and anchor at corners to prevent edge lift. After finishing, trim loose threads and press gently to flatten the seam without distorting the patch.
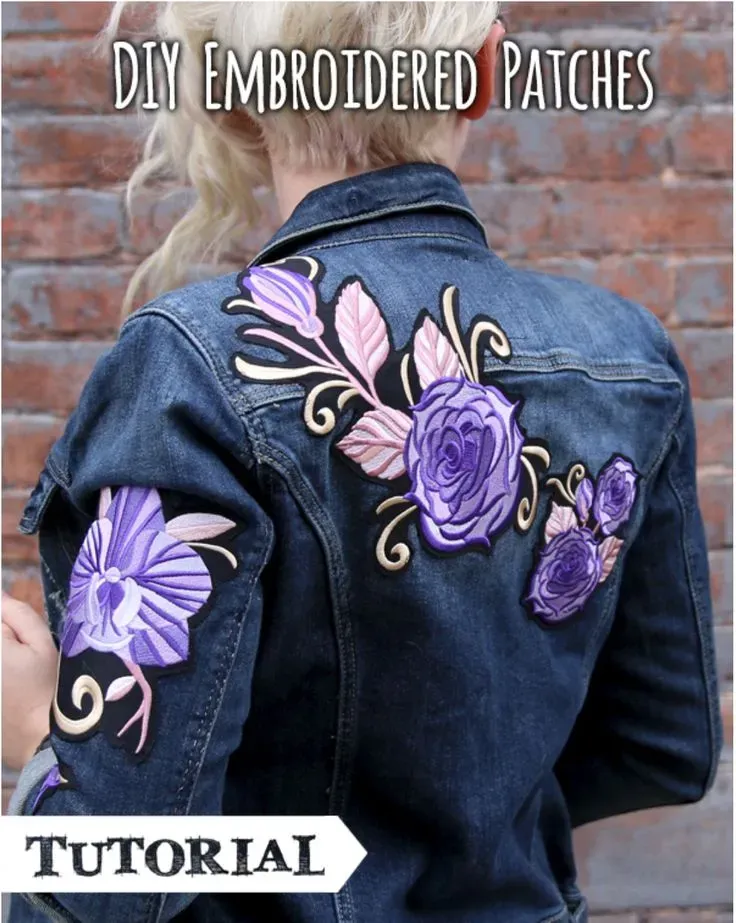
Denim Patch Repair and Beyond: Patches on Jeans, Jackets, and Canvas
Denim patch repair benefits from strong materials and deliberate stitching. Use heavy-duty polyester thread and a sturdy needle, and consider reinforcing with a stabilizer to prevent edge fraying on thick fabrics. The patch shape and size should complement the garment’s surface area, offering both aesthetic appeal and functional reinforcement for high-stress zones.
While denim is a common focus, patches also inhabit jackets, backpacks, canvas sleeves, and even leather accents. For knits or jersey fabrics, keep stitches lighter and use stabilizers to prevent fabric distortion. Leather patches may require specialized needles or hand-tacked stitches. In every case, the goal is a durable, visually cohesive repair that respects the fabric’s texture and movement.
Care, Troubleshooting, and Longevity: Keeping Patches Looking Fresh
Proper care extends the life of patches. Turn garments inside out to protect embroidery and avoid high heat in the dryer, which can cause peeling or cracking. For denim and heavy fabrics, gentle cycles and air drying can dramatically improve longevity. If you notice edge lifting, re-sew with a few strategic stitches at the corners to re-anchor the patch.
Troubleshooting common issues can save a patch from failure. Puckering edges may indicate the need for stabilizer or adjustments to stitch length and tension. If an iron-on patch starts to peel, re-press with adequate heat and pressure, or seal the edge with a few small stitches for extra security. Regular upkeep—checking seams after washing and re-stitching when necessary—helps maintain a presentable, durable patchwork look.
Frequently Asked Questions
What is the DIY Patch Tutorial and what patch sewing basics does it cover?
The DIY Patch Tutorial is a step-by-step guide for applying patches to garments and accessories. It covers patch sewing basics such as fabric prep, patch selection, stitching options, and finishing touches to achieve durable, neat results.
How to sew patches according to the DIY Patch Tutorial?
It walks you through a clear, step-by-step method: prep fabric and patch, secure with pins or baste stitch, choose a stitch style (running, blanket, or zigzag), stitch around the edge, and finish with a tidy trim.
Iron-on patches vs sew-on: guidance from the DIY Patch Tutorial?
The guide explains when to use iron-on patches for quick fixes and when sew-on patches are preferable for durability. It covers heat, pressure, and optional stitching to extend life, helping you decide between iron-on and sew-on.
What patch application tips does the DIY Patch Tutorial offer for denim patch repair?
For denim patch repair, it emphasizes accurate placement, fabric stabilization, secure stitching around the edges, and finishing with a press and trim. It also notes that pairing iron-on patches with a few stitches can boost longevity.
What materials and tools does the DIY Patch Tutorial recommend for patch sewing, particularly when working with denim patch repair?
It recommends choosing patches appropriate for the fabric, using polyester or cotton embroidery thread, a suitable needle, pins, scissors, stabilizer, and an iron. These tools help ensure durable seams and precise placement on denim and other sturdy fabrics.
What care guidance does the DIY Patch Tutorial offer to maintain patches after application?
It suggests following patch care tips such as washing inside out on a gentle cycle, avoiding high heat, re-sewing edges if they lift, and using proper storage. Adhering to these patch application tips helps patches stay secure and looking neat.
| Aspect | Key Points |
|---|---|
| Introduction | Patches revive garments, extend fabric life, and add personality. The guide covers iron-on and sew-on methods, from prep to finishing, for durable, visually appealing results. |
| Materials & Tools | Patches (iron-on for quick fixes; sew-on for durability), thread (polyester or cotton), needles, pins/chalk, scissors, stabilizer (optional), iron and board, backings (for sew-on). |
| Patch Types | Iron-On: quick, heat-bonded patches. Sew-On: most durable, stitched around edges. Choose based on fabric and wear. |
| Placement & Planning | Plan placement before stitching. Mark edges with pins/chalk, keep patch proportionate to garment, and tailor stitch methods to fabric (avoid puckering on stretches). |
| Sew-On Method | Prep area, secure patch (pins or baste). Choose stitch (running, blanket, or zigzag). Stitch around edges (2–3 mm apart). Finish and trim. Start underside to hide knots. |
| Iron-On Method | Position patch, cover with cloth, and press at recommended temperature 15–30 seconds. Re-press from the back for extra strength. Optional: add a few stitches around edge for durability. |
| Care & Maintenance | Wash inside out on gentle cycles; avoid high dryer heat. Re-sew edges if lifting occurs. Use stabilizers on delicate fabrics. |
| Troubleshooting | Puckering: use stabilizer or shorter stitches; patch not sticking: ensure clean, dry surface and adequate heat/pressure; loosened patches: re-sew with stronger stitches. |
| Fabric-Specific Tips | Denim/Canvas: sew-on with durable stitches; Knits/Jerseys: smaller stitches and stabilizer; Leather: use leather needles and possibly patch kits. |
Summary
DIY Patch Tutorial provides a concise, practical overview of patching challenges and solutions, helping readers choose patches, materials, and techniques suitable for denim, jackets, backpacks, or canvas. By following the step-by-step guidance—from prep to finishing touches—and understanding care and troubleshooting, you can achieve durable, visually appealing patches that reflect your style.