If you’re wondering how to remove patches from clothes without damaging the fabric, you’re in the right place. This guide covers iron-on, sew-on, and embroidered patches and focuses on techniques for removing iron-on patches and other types that protect texture and color. You’ll find practical steps that show how to remove patches from fabric while minimizing risk to fibers. These patch removal tips for clothes emphasize preventing fabric damage when removing patches and avoiding sticky residues. And if a little wear remains, you’ll learn repair after patch removal to restore a garment’s look and longevity.
Viewed through a broader lens, removing decorative patches from fabrics involves choosing methods that protect fibers and seams during patch detachment. You’ll hear terms like garment restoration, patch removal on textiles, and fabric-safe adhesive solvents as you compare iron-on versus sew-on techniques. LSI-friendly language emphasizes related concepts such as colorfastness, seam integrity, residue management, and upcycling opportunities after detachment. In practice, readers may replace a patch with a new motif, perform decorative stitching, or opt for professional repair depending on fabric value.
Understanding patch types and how to remove patches from clothes safely
When you’re faced with patches on garments, the first step is recognizing the patch type because each kind carries its own removal risk. Iron-on patches rely on heat-activated glue, sew-on patches are secured with stitches, and embroidered patches sit atop the fabric with threadwork underneath. Knowing the differences helps you plan a safe approach and reduce the chance of fraying, discoloration, or fabric thinning. This guide walks you through how to remove patches from clothes safely, regardless of patch type, so you can refresh your wardrobe without damaging the fabric.
Assess the patch before you begin: check how it’s attached, the fabric’s tolerance to heat, and whether there’s a backing or adhesive residue. Understanding these details supports a careful, methodical process and lowers the risk of unintended damage. With the right assessment, you can choose the best method for each patch and keep the garment’s fibers intact as you proceed.
How to remove iron-on patches safely and prevent fabric damage when removing patches
Iron-on patches are convenient but demand a gentle approach to avoid scorching or color changes. To learn how to remove patches from fabric without harming the underlying material, start with a low heat setting and a protective barrier such as parchment paper or a cotton cloth. The goal is to soften the glue just enough to loosen the bond without transferring heat to surrounding areas.
A controlled, patient process reduces the risk of sticky residues or fabric distortion. Lift the patch edge gradually with a fingernail or tweezers, reapply heat as needed in short intervals, and peel slowly from one side to the other. After removal, treat any remaining adhesive with a fabric-safe solvent, test on a hidden area first, and then wash the fabric according to the care label to prevent staining.
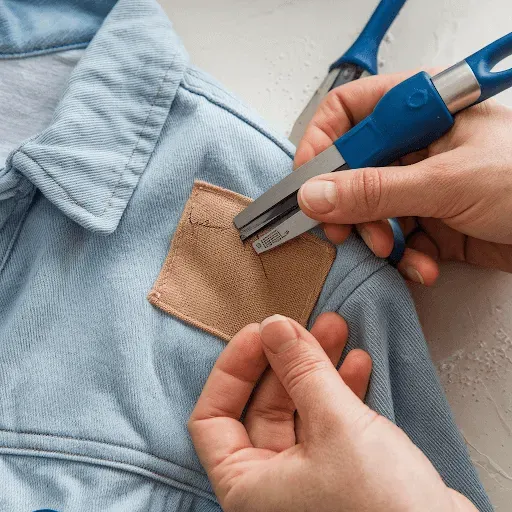
Sew-on patches: patch removal tips for clothes and minimizing fiber fray
Sew-on patches require a different mindset because there’s no glue to soften—there are stitches to release. This means you’ll follow ‘patch removal tips for clothes’ that center on seam extraction rather than heat. Start by turning the garment inside out to locate the thread line and identify the stitching pattern, then prepare your seam ripper to release threads without pulling on the fabric.
Work slowly along the patch’s edge, cutting threads one by one rather than ripping. Use tweezers to lift the patch once most stitches are removed and address any tiny thread remnants with careful snips. After the patch is free, inspect for frayed edges and trim or reinforce as needed, keeping the garment’s integrity intact while avoiding new damage.
Dealing with adhesive residue after patch removal and protecting fabric integrity
Residue from glue or backing is the most common follow-up challenge after patch removal. Effective handling starts with non-abrasive, fabric-safe approaches that align with long-term fabric health. You’ll often use methods similar to repairing after patch removal, focusing on residue control as a separate step to prevent color transfer or staining.
Isopropyl alcohol applied with a soft cloth can remove many adhesives from synthetic fabrics, but always test first on an inconspicuous area. If alcohol alone isn’t enough, look for a mild fabric-safe adhesive remover and follow the product directions, testing again before broad application. Finish by washing the area as directed and air drying to keep fibers from distorting or becoming permanently stiff.
Repair after patch removal: restoring appearance and garment strength
After patches come off, you may notice small issues like tiny holes, slight discoloration, or threadbare spots. Repair after patch removal can involve decorative stitching, darning, or applying a new, more discreet patch if you plan to reuse the garment. These options help restore strength and deliver a finished look without compromising the fabric.
Consider skillful alternatives such as running a neat line of embroidery around the repair area, patching with a matching fabric, or using fabric glue for a quick reinforcement when appropriate. If the fabric is valuable or delicate, you may opt for a professional repair service to ensure the repair is durable and visually seamless.
Post-removal care and fabric preservation to keep garments looking new
With the patch removed, use gentle care to preserve the fabric’s integrity. Wash on a cold or warm setting with a mild detergent, and consider a delicate cycle or mesh laundry bag for snag-prone textiles. Air drying is preferred to avoid heat-related distortion, and if ironing is necessary, use a low heat setting with a pressing cloth.
Regular inspection after removal helps catch snags or color changes early, enabling prompt repair or reinforcement. By staying mindful of care labels, avoiding harsh solvents on sensitive fabrics, and choosing conservative heat exposure, you extend the garment’s life and maintain a clean, unified appearance after removing patches.
Frequently Asked Questions
How to remove patches from clothes safely for iron-on, sew-on, or embroidered patches?
Start by identifying the patch type and testing colorfastness on a hidden area. For iron-on patches, gently lift a corner, apply low heat with parchment paper or a cotton cloth, and slowly peel as the glue softens. For sew-on patches, turn the garment inside out and use a seam ripper to release stitches, working slowly to avoid fabric snags. For embroidered patches, remove any backing and threads carefully, then clean away loose threads. Finish by washing the area per the care label and inspecting for any color changes or thinning.
What are patch removal tips for clothes to prevent fabric damage when removing patches?
Follow patch removal tips for clothes that minimize fabric damage: test heat or solvents on an inconspicuous spot, avoid yanking, and use the right tools—seam ripper for sew-on, tweezers for edges, and parchment paper for iron-ons. Work from the edge of the patch inward, removing threads or glue gradually. If the fabric is delicate, consider alternatives or professional help rather than forcefully removing patches.
How to remove patches from clothes with iron-on patches without scorching or leaving residue?
To remove patches from clothes with iron-on patches without scorching, start by testing a hidden area. Loosen the patch edge, cover it with parchment paper, and apply a low, steady heat briefly until the edge yields. Peel the patch away slowly from edge to center, reapplying heat as needed. Use isopropyl alcohol on a cotton swab to dab away any adhesive residue, then launder the area as directed.
How to remove patches from clothes when dealing with sew-on patches to avoid fabric damage?
To remove patches from clothes with sew-on patches, turn the garment inside out and locate the stitching. Use a seam ripper to cut threads, working slowly along the patch edge. When most stitches are gone, lift the patch with tweezers and remove any remaining threads. Inspect the fabric for frays and trim if needed; finish with a light wash and consider decorative stitching or a new patch if you’re reusing the garment.
How to remove patches from clothes and deal with glue residue after removal?
Residue after removal is common. Dab the area with a cloth and apply isopropyl alcohol to lift any glue, testing first on a hidden spot. If needed, use a fabric-safe adhesive remover following the product instructions and test again. For stubborn residue on sturdy fabrics, a small amount of acetone-based remover can help, but avoid acetone on delicate fabrics. Rinse and launder as the care label directs and air dry.
What repair after patch removal options can help restore a garment after removing patches from clothes?
Repair after patch removal options include patch replacement with a new design, decorative stitching or embroidery around the area, darning or patching to cover holes, or seeking professional repairs for high-value garments. Post-removal care and gentle laundering will help preserve the fabric after any repair.
| Topic | Key Points |
|---|---|
| Patch types and risks |
|
| Tools and supplies |
|
| Remove iron-on patches safely |
|
| Remove sew-on patches without damage |
|
| Residue and glue after removal |
|
| Delicate fabrics considerations |
|
| Repair options after removal |
|
| Post-removal care |
|
| Common pitfalls |
|
Summary
This HTML table summarizes the key points for removing patches from clothes, including patch types and risks, necessary tools, iron-on and sew-on removal methods, dealing with residue, delicate fabric considerations, repair options, post-removal care, and common pitfalls.